Acctivate connects to the Microsoft SQL Server database using a single SQL Server user account with full access. You may need to configure additional SQL Server user accounts for other applications to restrict data access. You'll need to install Microsoft SQL Management Studio to do so. You can find the install here.
The following steps should be taken by your IT department or at the advice of an IT professional. The Acctivate support team is unable to provide advice on SQL server security.
Creating the User Login:
- Log in to the primary computer (i.e. server) where Acctivate is installed with a Windows user account with administrator privileges.
- Open Microsoft SQL Server Management Studio from Windows Start menu, in the Microsoft SQL Server folder.
- Select your server as the Server Name on the Connect to Server window. This will typically be something like SERVERNAME\Acctivate although could be different if you're not using the default Acctivate instance name. Please consult your IT for more info.
- Login either using Window Authentication if you're a domain admin, or with SQL authentication using the SA user account. Please consult your IT for the password, or reach out to the Acctivate support team.
- Expand the Security folder in the panel on the left.
- Right-click on the Logins folder and select New Login…
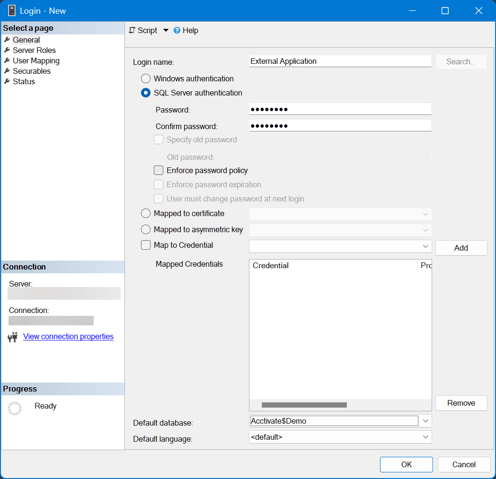
- Enter the desired Login name (i.e. External Application)
- Select the SQL Server authentication option.
- Enter and confirm the desired password.
- Optionally you may want to uncheck the Enforce Password policy and Enforce Password expiration options. If you opt to Enforce password policy, you can see the guidelines here.
- Un-check the User must change password at next login option.
- Select the Default database that corresponds to your Acctivate company.
- At this point your login should look similar to the following:
- At this point your login should look similar to the following:
- Click User Mapping in the panel on the left.
- Check the Map box adjacent to the database for each Acctivate company to grant access.
- If you want to give read-only access to the entire database, then check the db_datareader checkbox on the bottom section under Database role membership
- If you only want to grant access to specific views, click the OK button to exit the window and continue to the next portion of the guide.
- Click OK.
At this point you're done and ready to give the user account to the user/service requesting it.
(Optional) Assigning specific views to the SQL user account:
There may be times where you do not want to grant full access to the database and may only want to provide access to specific views such as orders, or customers. These steps will show you how to do so. You can refer to our doc's page for information about the various views to help determine what views to give access too.
- Expand the Databases folder in the panel on the left.
- Expand the database that corresponds to the Acctivate company (e.g., ACCTivate$Demo)
- Expand the Views folder.
- Grant access to the view with the following steps:
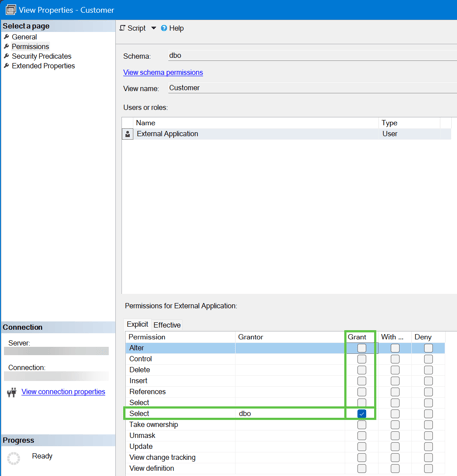
- Right-click one the view name and select Properties.
- Click Permissions in the list on the left.
- Click Search... on the right
- Enter in the SQL Login name you created in the section above in the box.
- Click Check Names and then click OK.
- If you get a warning that the name doesn't exist, double check you entered it in properly.
- Select the checkbox in the Grant column for the Select row.
- Click OK to exit the window.
- Repeat step 4 for each view you'd like to give access too.