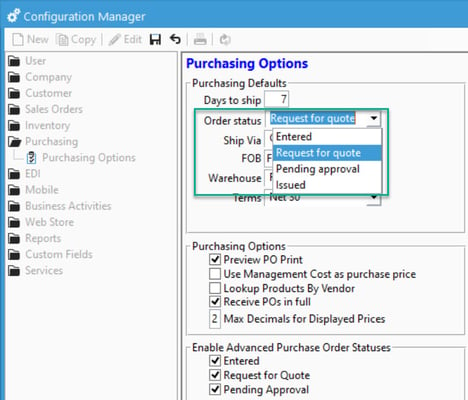
Using advanced Purchase order statuses
This help article explains how to use the advanced PO statuses (Entered, Request for Quote, and Pending Approval.)
Acctivate not only allows a user to have separate Sales order statuses, but Acctivate also allows for advanced Purchase Order statuses as well! This article will walk you through how to use these statuses and how to switch between them.
Configuring Acctivate for advanced PO statuses:
The first thing we need to do is setup these statuses in Acctivate. To do so, follow these steps:
- Open Configuration Manager -> Purchasing -> Purchasing Options
- Check to enable, or uncheck to enable which advanced PO statuses you'd like to use.
- Decide what status you'd like to default to. A good default is "Entered" as it allows you to just enter a PO and determine status vs having one auto set.
- Click Save (or "CTRL" + S) and exit configuration manager.
Using Advanced Purchase Order Statuses
- Default Entered:
- When defaulting as entered and saving the PO, the top bar will have two options:
- "Request Quote (RFQ)" to transition your entered PO to a RFQ.
- "Issue PO" to transition your entered PO to a full PO.

- When defaulting as entered and saving the PO, the top bar will have two options:
- Default RFQ:
- When defaulting as RFQ and saving the PO, the top bar will have the option to "Issue PO"
- You can use the "Action" button to transition to "Request Approval", "Approve and Issue," or "Revert to Entered"
-

- Default Pending Approval:
- When defaulting to pending approval and saving the PO, the top bar will have the option to "Approve and Issue" and the corner text will display "Pending Approval PO" in red letters.
- You can use the "Action" button to transition to "Request For Quote".

- Default Issued:
As you can see, Acctivate allows you to track your PO's at all stages. If you'd like to learn more about how Purchasing works, please check out our training page for up to date information.


