Generate lot/serial number report based on Expiration Date.
Add a report selection prompt to the Inventory Lot / Serial Report to filter lot or serial numbers based on Expiration Date
The Inventory Lot / Serial Report can generate a list of your lot and serial numbered products in stock within Acctivate. For customers that stock products that can expire, you may set the expiration date on the lot / serial numbers when you are receiving.
If you need to view a list of lot / serial numbers that may be expiring soon, you may want to filter the report based on the expiration date.
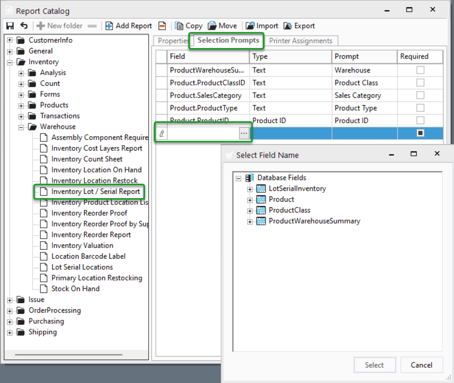
- Within Acctivate, navigate to File -> Manage Reports. This will open the Report Catalog, where you can manage selection prompts, printer assignments as well as check out or check in customized reports.
- In the Report Catalog, expand the Inventory -> Warehouse tree
- Select the Inventory Lot / Serial Report.
- Edit the Report Catalog
- Select the 'Selection Prompts' tab.

- Within the grid, click three dot icon in the [Field] field. This will open up the Select Field Name window.
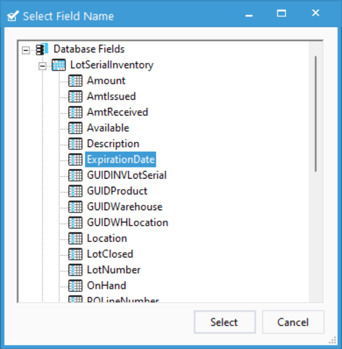
- Expand the LotSerialInventory database fields, then select the ExpirationDate field.

- Click the [Select] button.
- Save the Report Catalog and close the window.
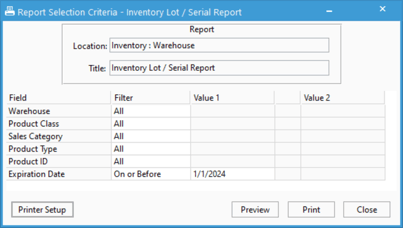
- Now, run the report. You can find the report under Inventory -> Inventory Management Reports. Expand Warehouse. Then, select the Inventory Lot / Serial Report.
- In the Report Selection Criteria window, you can modify the filter for the Expiration Date field to something like 'On or Before', then select the date of your choice.
