For Customers on RightNetworks, the process of connecting Crystal Reports to the Acctivate database is a bit more involved than normal. This is because RightNetworks does not allow for someone to connect to the Database outside of the remote environment, and RightNetworks also does not allow for the installation of Crystal Reports.
For RightNetworks customers looking to edit or create new reports for Acctivate, you'll need to obtain a database backup from RightNetworks and restore it to your local computer. This also means you'll need to download SQL server locally. For a step by step guide, see below:
- First you will need to request a backup file of your Acctivate database from RightNetworks support.
- Install SQL server on your local computer. You can install SQL server express for free and setup an instance. We recommend not performing the basic SQL install, but instead doing a custom install so that you can name your instance and set the password. Please refer to this article if you'd like step-by-step instructions for installing SQL server.
- Once SQL is installed, you will need to download Microsoft SQL Server Management Studio so that you can restore the database to your SQL instance. You can obtain SQL Server Management Studio for free from Microsoft located here.
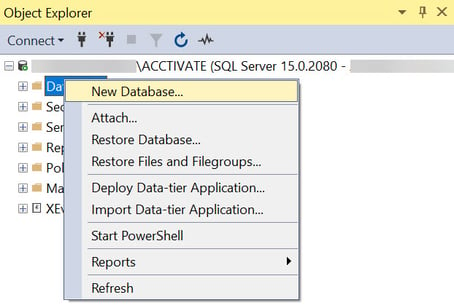
- Next open Microsoft SQL Server Management Studio and sign into your SQL Server instance. On the left side in the "Object Explorer," right click "Databases" and select "New Database."
- Name your database whatever you'd like it to be. Leave all other options alone.
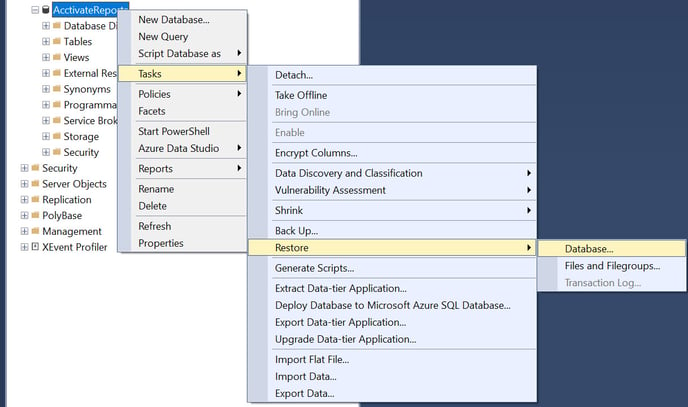
- Once your database is created, it will appear under the Database header. Right click your database, and navigate to Tasks -> Restore -> Database
- In the "Restore Database" window, change the "Source" to the "Device" radio button, and then click the "..." button.
- In the "Select backup devices" screen, ensure the "Backup media type" drop down is set to file, and then click the "Add" button.
- Navigate to the location of the backup file that you obtained from RightNetworks, and then change the file type dropdown to be "All Files(*)" Then select your .bkf file.
- Click "OK" in the "Select backup devices" window.
- In the "Restore Database" screenm ensure that the "Database" drop down is set to the name of your database (This should be something along the lines of Acctivate$CompanyName.)
- Select the "Options" page in the left side of the window.
- Check the "Overwrite the existing database (WITH REPLACE)"
- Click "OK"
- Once you receive the "Database 'Name' restore succesfully" prompt, you're done with Microsoft SQL Server Management Studio.
- Open Crystal Reports and create the connection to your database. Check our docs page for instructions on this.

At this point, you are now able to edit the report normally. At any time if you need to get an updated database, you will need to repeat the above steps of obtaining a database copy from RightNetworks and restoring it.