How does Acctivate Process Credit Cards and eChecks?
Acctivate offers the ability to process credit cards and eChecks through Authorize.net and Intuit Payments. Check out this article for a how to!
Acctivate users that also use Intuit Payments (formerly Intuit Merchant Service for QuickBooks) or Authorize.net can process credit cards and eChecks directly in Acctivate!
Before a payment can be processed, configuration must be performed in both Acctivate and Intuit Merchant Service. For details on the configuration refer to our Intuit payment and Authorize.net guides.
Credit Card Processing:
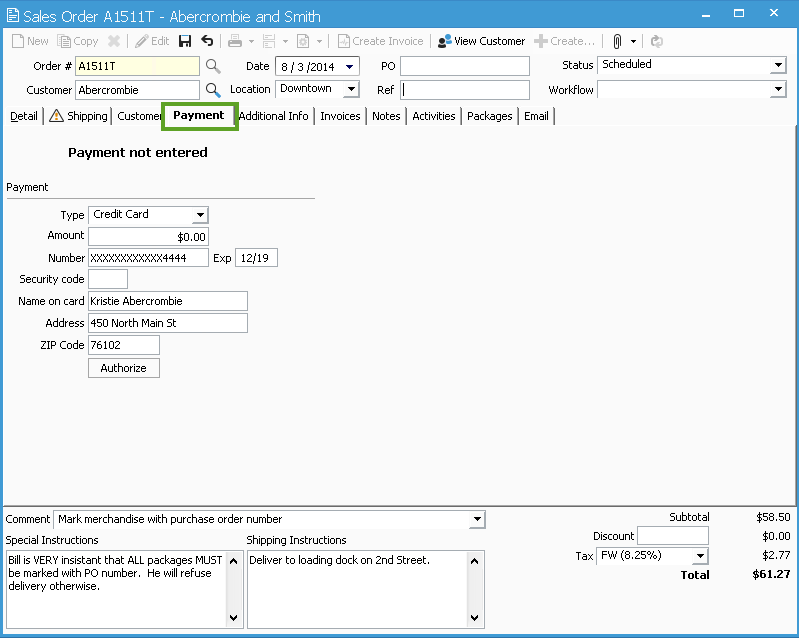
Option 1: Save payment information on the Payment Tab of the sales order
Payment information can be saved on the Payments tab of the sales order so that when you open the Create Invoice window the payment information is already populated and ready to charge. Alternatively, if you enter payment information on the Payment tab of the sales order you can Authorize the charge on the credit card. In that case, when you open the Create Invoice window you will have a chance to Capture the authorization, which charges the credit card.
- Enter a new sales order or open an existing one.
- From the sales order, click the Edit button, if not already in edit mode.
- Open the Payment tab select a valid payment type for the credit card in the Type drop-down box.
- Then, enter the credit card number and expiration date of the card in the corresponding fields. These fields will automatically populate, if credit card information is on file for this customer in the Credit tab of the Customer Information window. The populated information can be edited.

- The Payment Amount field will automatically populate according to the sales order amount. If the amount is different than the amount displayed, manually enter the correct amount. A balance due will appear in the bottom right corner of the screen.
- The credit card information entered here will automatically populate the Create Invoice window when it's time to invoice the order. Alternatively, you could Authorize the charge.
Option 2: Enter payment information in the Create Invoice window and charge the card
- From the sales order, click the Create Invoice button (or type Ctrl-I).
- The Create Invoice window will open.
- In the Payment section enter the Credit Card Information, including payment information, credit card number and expiration date. These fields will automatically populate, if credit card information is on file for this customer in the Credit tab of the Customer Information window. The information can be edited if necessary.
- The Amount field will automatically populate according to the sales order amount. If the amount is different than the amount the system inputted, manually enter the other amount.
- Make certain that the Charge CC checkbox is checked (even if it's grayed out and is not changeable). Please note: If the Charge CC box is not checked, the amount will be moved to the undeposited funds section in QuickBooks. Acctivate does not currently work with a credit card reader. All cards must be manually inputted.
- Click Invoice and the credit card will be charged through Intuit Merchant Service.
- The credit card will be charged at this point. This is not a pre-authorized charge. The credit card number will be represented by x's after it has been released for invoicing.
Option 3: Use the Enter Payments window to process the credit card.
-
Add a customer to the Enter payment window. Alternatively, from the Edit customer window, Customer list, or the Order window, you can click "Create" -> "Payment" to have the window populate the details automatically.
-
Enter an amount into the "Payment Amount" field.
-
Change the "Payment Method" box to a payment method that is type of "Credit Card" (from QuickBooks)
-
If a credit card is saved on the customer, then credit card details will populate automatically, else you can click the "Save Card" button to save the card.
-
The "Charge CC" checkbox should be checked automatically.
-
-
Click the "Charge and Save" button to process the card through your processor.
*eCheck Processing:
Use the Enter payments window to process the eCheck
- Add a customer to the Enter payment window. Alternatively, from the Edit customer window, Customer list, or the Order window, you can click "Create" -> "Payment" to have the window populate the details automatically.
- Enter an amount into the "Payment Amount" field.
-
Change the "Payment Method" box to a payment method that is type of "eCheck" (from QuickBooks)
- The "Process eCheck" box will automatically be checked.
- Select the Account type from the dropdown box.
- Enter in the name on Account, Routing Number, Account Number and Account Phone (Bank name if using Authorize.net).
- The next time you select this customer and account type, these fields will auto populate. This is per account type.
- Click "Process and Save."
- Verify that you have signed authorization to process the eCheck to process the eCheck through your processor.
eChecks are only able to be processed through the Enter Payment window.
*eCheck processing for Authorize.net added in Acctivate 11.3.
Voiding an invoice with a Credit Card or eCheck
If it is necessary to void an invoice please make note of the following information:
- If the invoice is voided before a synchronization between Acctivate and QuickBooks occurs then:
- The credit card/eCheck transaction will be voided in Acctivate.
- No credit card/eCheck information will be transferred to QuickBooks for the invoice.
- If the invoice needs to be voided after synchronization with QuickBooks:
- Void the payment in QuickBooks.
- The payment will be removed from Acctivate during the next synchronization.
Acctivate will attempt to void the Credit card/eCheck if possible, however if the payment has already been batched through Intuit Payments/Authorize.Net, Acctivate will be unable to void the transaction. You will instead need to void the transaction through your payment processor.