The Import Product Prices feature allows you to easily and quickly update product specific prices of already existing products in Acctivate. This can be done with an Excel file or a standard CSV file that contains products you already in Acctivate. The Product Price import can be used to add to or update existing prices. Updates only occur when the data being imported matches all but the price itself. If there is no match, a new record will be created.
Note:If you are only updating the list price then this is done through Import Products (see: update product information from a file)
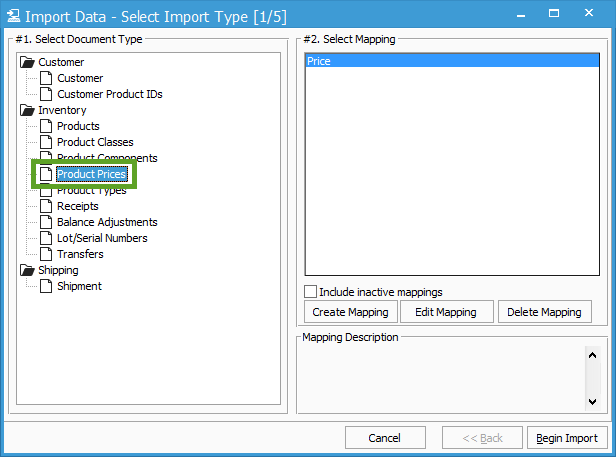
Select Import Type [1/5]- Select File > Import Data to open the Select Import Type window, the first of five windows in Import Data.
- Click Product Prices from the Inventory folder in the #1 Select Document Type window.
- On the right side of the screen in #2 Select Mapping, click either the Create Mapping or the Edit Mapping button depending on the circumstance. It is necessary to create a new mapping profile for the first time that you import a file. When modifying an existing template to use a different spreadsheet, select the specific mapping and click Edit Mapping. If you're needing to simply run the import as is, go straight to Begin Import and skip to the Import Confirmation [3/5] section of this article.
- Choose the Excel (xls, xlsx) spreadsheet or CSV file you wish to import in the Filename box within the Source Spreadsheet section. After selecting the file to import, the information listed in the file will be displayed in the Preview window on the right-hand side of the screen. Each column will be labeled A, B, C, and so on, depending on how many columns there are in your file.
- If the file contains multiple worksheets, select the worksheet you want to import by using the drop-down menu in the Worksheet field.
- Check or uncheck the First row of spreadsheet contains field names checkbox depending on the values of the first row on the worksheet. If the first row contains the titles of each column, check the box to view the titles as they are in the file. These titles will not be used in the import process, but rather as a reminder of what information is listed in each column.
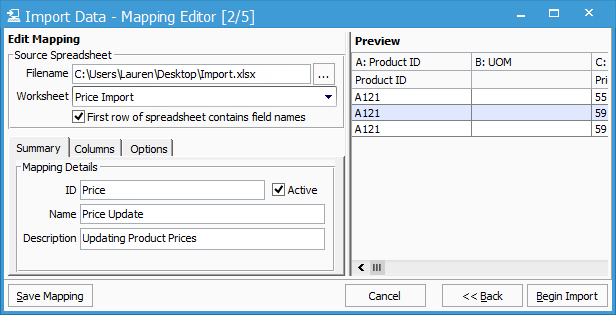
4. In the Summary section, give the template an ID, Name, and Description to identify what you’re importing, as well as marking the mapping as Active (or unchecking the Active box to make it Inactive). Use relevant, unique information for easy recognition in case you wish to go back and reopen the saved mapping at another time. If you’re editing an existing map, you won’t need to specify this information unless you simply want to update it.
5. To map the spreadsheet columns to fields in Acctivate, start by selecting the Columns tab. It’s best to name the columns in your spreadsheet as something relatable to the field it will be imported into on the Product Information > Prices tab. The Preview section of the mapping editor shows you which column has been mapped to each field in Acctivate. The top row shows your spreadsheet headers and the second row shows the field it’s mapped to.
6.Click on the specific Acctivate field you wish to map to make that row active and choose the column from your spreadsheet in the Mapped field section.
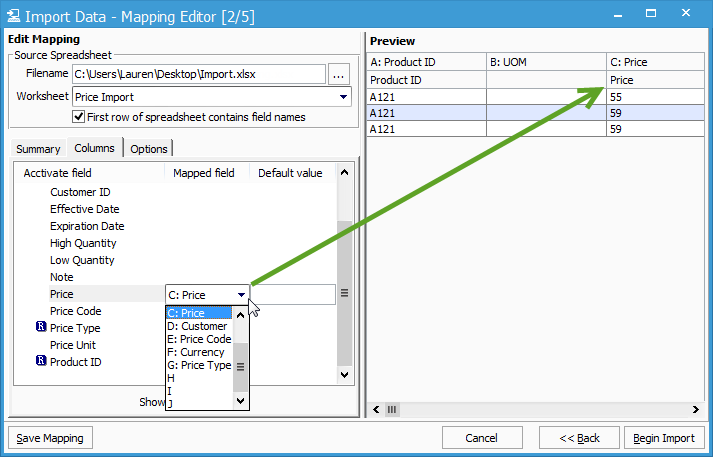
7. Repeat this process until you have mapped all fields in your spreadsheet you wish to import. See this article for all available fields for importing product prices.
8. In the Default Value field, enter a value or select one from the list (if given) of the value that should be used for all products in your file. The blue "R's" next to the field names: Price, Price Code, Price Type, Price Unit and Product ID require at least a default value to be selected, if they are not mapped and you're creating new records.
9.Most customers can leave the Options tab as is. These advanced options tell Acctivate how to handle duplicate and missing information. For more information about these options and how they affect the import, check out the Advanced Import Options article.
10.Once the mapping has been completed/updated, click the Save Mapping button.
11.Click the Begin Import button, after you have reviewed the information in the Preview window for approval.
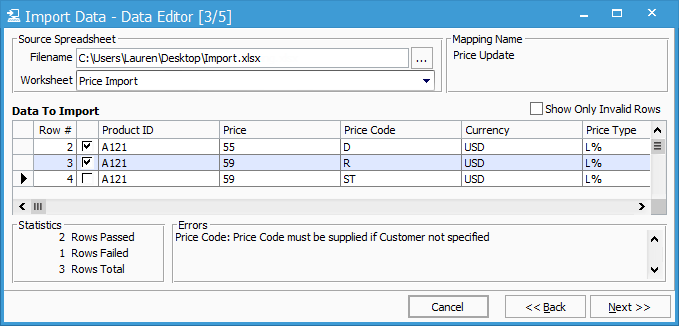
Data Editor [3/5]- The third window, Data Editor will open.
- Depending on what you want to view in the Data to Import data grid, check or uncheck the checkbox near the top that reads Show Only Invalid Rows.
- Near the bottom of the window in the Statistics section, the number of passed and failed rows will be shown, as well as a total row count. Please review this information and act accordingly.
- If rows failed (unchecked), an explanation of the error will be displayed in the Errors section, as you select each line. The error listed below is due to the Price Code not being setup in Acctivate.
5. There are a few options for resolving errors:
- 1.Edit the data from this window. This will not update your spreadsheet, but it will allow you to edit the data in order to import the failed rows.
- 2.Click the Back button, click on the Acctivate field with the error, and Show Conversions. This gives you the ability to “convert” values in the spreadsheet from incorrect to correct data. Based on the error shown above, we can setup a conversion for Preferred Vendor in the previous screen:
[easingslider id="22157"] - 3. Close the Import Data utility, update your spreadsheet, and start the import again.
Note: Acctivate can create a spreadsheet with all the rows that failed the import (this step is detailed in the Importing [5/5] window section, step 2)
6. If the error is not in the source file, the error could have been made when mapping. If this is the case, click the Back button and in the Columns tab review your mapping. Re-save if changes are made.
7. When ready, click the Next button.
Import Confirmation [4/5]- The fourth window, Import Confirmation will open.
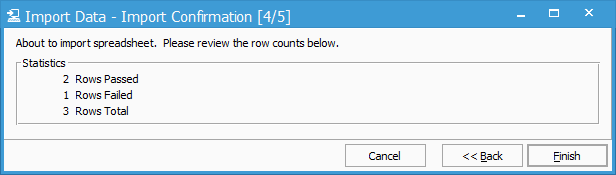
2. Before actually importing the data, review the statistics given in this window.
3. If you approve the provided statistics, click the Finish button. To correct failed rows, see step 5 of the Data Editor [3/5].
4.You will be prompted to backup your database before importing. Database backup is strongly recommended.
5. Click the Start Backup button.
6. You will see a “[…]Do you wish to proceed?” prompt. Select Yes.
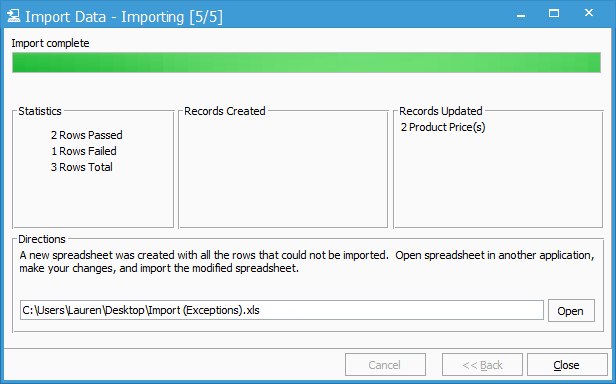
Importing [5/5]:- The Importing will open. This window is where the actual data is being imported into Acctivate. A progress bar will show progress as the data is imported into Acctivate. Importing may take a considerable amount of time depending on the size of the file being imported and the speed of your system. Never end task on an import. There could be a large list of rows causing it to seem locked up or frozen or an exception spreadsheet being created for any errors.
- If there were errors, you will be prompted to create an exceptions spreadsheet. This spreadsheet can be used to cleanup any bad data and re-imported without having to manipulate the original spreadsheet. Each row in the exception spreadsheet will list the specific error that caused it to fail. Click Yes and select a location to save it.
- A pop-up window will appear when the Import process is complete. Click OK on this pop-up window.
- Statistics (as described in the previous steps), as well as, the number and types of records created and updated in Acctivate will be given in the window. If a spreadsheet was created with the failed rows, the Directions Section will appear in this window. It tells the user where the file was saved so it can be opened in another program (i.e. Excel) to make your changes and import the modified spreadsheet. Click the Open button and the spreadsheet will open with all the failed rows, which will include the row number as it relates to the your original spreadsheet and exceptions (a brief explanation of why each row failed the import).
5. Click the Close button.
6. Open the Product Information window in Acctivate to view the updated prices.
For more information about imports, check out our docs page.