Restoring the Acctivate Database in SQL Server Management Studio.
Restore the .bkf file in SQL Server Management Studio with either New Database or in an existing company.
If you are unable to restore your database file in AcctivateDBMaint or you are wanting to restore it to a different location than where Acctivate is installed then you may want to use SQL Server Management Studio to restore it.
Open SQL Server Management Studio and login using your Windows Authentication or the default database user ‘sa‘. (If you need to know the password for the ‘sa’ user, contact Acctivate Support.)
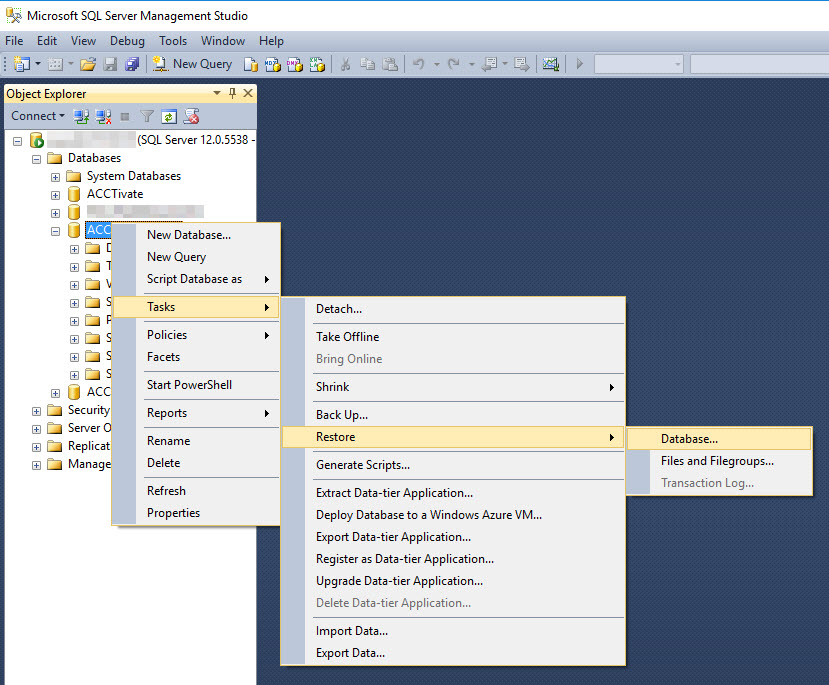
Once SQL Server Management Studio is open, select to expand the Databases menu. If you would like to add a new company file to restore your backup to, right click on Databases and select New Database. If you are wanting to restore your database to an already existing company, then right click on that company. Then go to Tasks > Restore > Database as seen in the screenshot below.

A new window will open and this is where you will select the file that you would like to restore from. Change the Source from Database to Device. Then select the ‘…‘ button to search for the database file. SQL Server Management Studio will then ask you to choose the Backup media type. You’ll want to choose file and then select Add.
Browse to the file location of the Database backup that you want to restore and then select “All Files” on the file type option in order to view a database backup created by Acctivate. Acctivate uses a file type of .bkf while SQL Server Management Studio defaults to use .bak. These file types are interchangeable so you can still select the backup file even if it has a type of .bkf.
Once you have selected the file to restore from, hit OK and then hit OK again on the Select Backup Devices window. You should now see the database as a set to restore from. Once you verify that everything is correct and you have the right file, select OK on the Restore Database window. A progress bar will show at the top of the window to indicate the restore of the database to the company file.