After posting an Inventory Count session, you'll be able to view the Variance report either immediately after posting or through the Inventory Reports menu. This report shows the variance (change) between the old and new inventory levels. You'll be able to see the difference between the on hand quantity at the time of creating the count and what was entered as the on hand quantity sitting in the warehouse. The report also gives you a total adjustment value in the report footer.
The user will be prompted to Preview or Print the Inventory Variance report immediately after posting the session. All the filters to see this specific session will be set automatically:
Accessing Variance Report at a later time
If you did not print or preview the Variance Report upon posting the count to inventory you can open the report by following the steps below:
- Open the Inventory Management Reports window by either selecting Inventory > Inventory Reports or clicking the Reports icon and expanding the Inventory Management section.
- Click the '+' sign next to the Count folder.
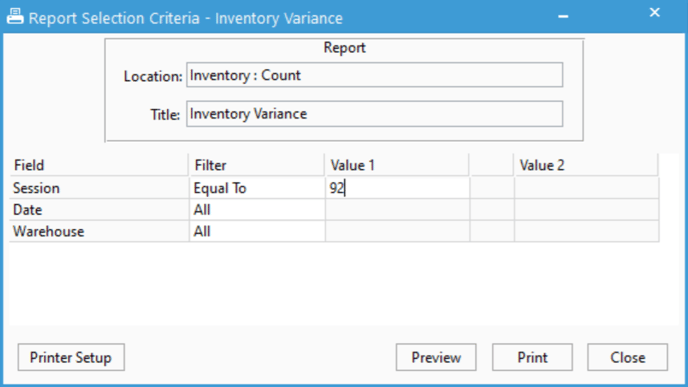
- Select Inventory Variance, which will open the Report Selection Criteria window.
- Filter the report on Session, Date, and/or Warehouse to get specific information.
- Select a logical operator from the drop-down list. For example, if you select All, all the completed counts will show up in the report. To narrow it down to specific counts you can select any of the other options to display what you want on the report.
- If you select Equal To, the Value 1 field will become active. Enter a value into the Value 1 field, which will display on the report just one specific completed count on it (whatever count is equal to the value you entered into the Value 1 field).
- If you select Between, the Value 1 and Value 2 fields will become active and the word 'and' will between them, so whatever values you enter into these two fields, the counts that are between them will be in the report.
- If you select Greater Than, the Value 1 field will become active, so whatever value you enter into this field, the counts that are greater than that value will be in the report.
- After specifying all necessary filters, you can Preview or Print the report.
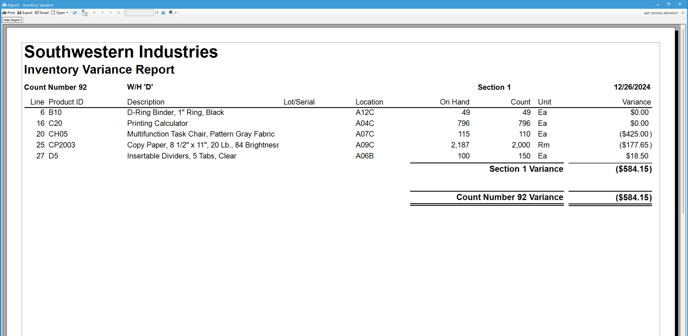
Explanation of Fields on Inventory Variance Report
- Count Number: Inventory Count Session Number
- W/H: The warehouse selected when printing the count
- Cycle: The count cycle entered when printing the count
- Section: This translates to the location zones when utilizing bin locations
- Date: Date of count
- Line: Line number in count sheet
- On Hand: On hand quantity at the time you printed the count
- Count: Number of units counted in the warehouse
- Unit: Stocking unit of measure on product
- Variance: Difference in value between on hand and count quantity
- Count Number ## Variance: Total adjustment value which will synchronize to QuickBooks