Mobile Order Showroom (Mobile Sales Orders) is an add-on module for Acctivate Mobile on devices running the Windows Mobile operating system.
Using a Windows Mobile device, you can create simple sales orders while walking around a show room that is in range of the local area network where Acctivate is installed.
Since the Mobile Order Showroom module is designed to be used in a showroom environment, it may not be suitable for all mobile order entry needs due to the limit of data that can be entered. For example, new customers cannot be created from the device, price codes, price units, tax rates, etc. can not be selected on the mobile device.
Instead, using a laptop with the desktop version of Acctivate is strongly recommended for the best order entry experience that also provides the ability to be mobile.
- Log into Acctivate on your handheld device. Enter your login information (i.e. Company, User ID, Password) and then click the OK button (green checkmark icon).
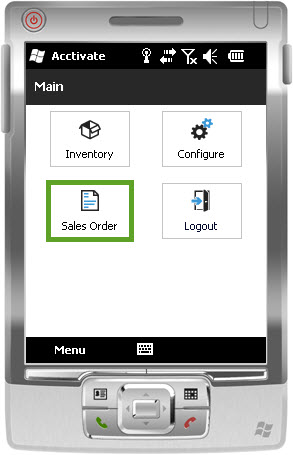
- The main menu will open with two options, select Sales Orders.
3. In the next screen, you have 3 selections:
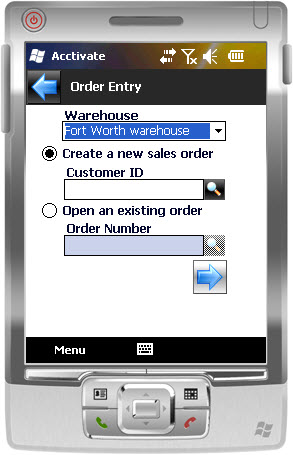
- Warehouse – Select when creating a new Sales Order, if different from the default warehouse shown
- Create a new Sales Order – You have the option of selecting the Customer ID on this screen. When doing so, either type the ID and press the blue arrow to submit or use the magnifying glass to lookup a specific customer.
- The lookup displays 10 customers at a time. Use the Up and Down buttons to see alternate pages. Select a customer from the list or click in the search field to enter the first few characters manually (with the keypad).
- Open an existing Order – Select or Scan a Sales Order number to open
4. On the next screen you will enter the products for the sales order. Lookup a product by clicking the Lookup button or scan a product with a barcode scanner.
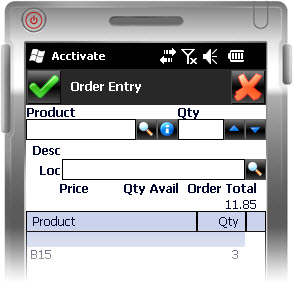
The lookup displays 10 items. To navigate through the pages, use the Up and Down buttons. Select a product from the list (highlight and click green checkbox) or click in the search field to enter the first few characters manually.
- When a product is selected, Price, Quantity Available, and Order Total will display. You can also, click the Info button (circle icon with “i”) to view additional product details (i.e. Inventory, Transactions, Note, and Notes).
- In the Notes tab you can enter a note by clicking the + button (next to the notepad icon).
- Click the Back button (blue left arrow icon) to return to the previous screen if you are in the Info screen.
- Enter a quantity of the product by scanning it multiple times, clicking the ∧ or ∨ icons, or by entering it manually.
- After you have entered a product and its quantity, to select another product click the Enter button (bent green left arrow icon).
- Repeat steps 4 – 6 for each product.
- When the order is ready to submit, click Green checkbox next to Order Entry.
- A confirmation message will appear asking if you want to Submit order? for the selected customer. If necessary, you can change the customer by following step 3.2 above.
- Click the Yes (green checkmark icon) to confirm the order submission or click the Back button (X icon) to edit any information. You can also choose to print the order using the provided checkbox.
