Merging Duplicate Customers
You can merge duplicate Customer records in QuickBooks and all related records will be updated in Acctivate.
You may find two customer records for the same company or individual. For example, we have a "Smith" and "Smith Photography" below.

You need to merge the customer records into one customer record using the QuickBooks Customer List. You will edit the Customer Name on one record to match the other Customer Name exactly. You will be prompted to merge the customers and may be prompted for the Closing Date password if there are old records. If you're using QuickBooks Desktop, you'll need to be in single-user mode.
Related records and information that will merge
- Transactions such as Sales Quotes, Sales Orders, Credit Memos, Invoices, Credits, Payments, and Statement Charges.
- Related Customer records in Acctivate such as Customer Prices, Product IDs, Contracts, Contacts, and Ship To Locations.
First, let's review and prepare the Customer records in QuickBooks
- Be sure that you carefully review and copy all of the customer data, including the address and contact information, to both customer records. We recommend that you take notes or a screenshot of the address and information that you want to keep, just in case.
- Create a new database backup for Acctivate and QuickBooks if you're merging customer records with thousands of transactions.
- Open the Customer List in QuickBooks and review both customer records.
- Are there transactions for one or both customers? Acctivate will only be able to merge existing transactions if this step is done correctly.
- Yes, both customer records have transactions. Great! You can rename either of the customer records and QuickBooks will consolidate all of the related transactions.
- Yes, only one customer record has transactions. Proceed with caution, as this may be counter-intuitive. You will need to rename the customer record that has transactions. You will need to keep the customer record with no transactions.
- No, these customer records do not have transactions. Easy! You can rename either of the customer records. However, try to rename the customer record that has no notes or pending transactions only in Acctivate. Otherwise, it may be re-created during the next sync.
Now, let's MERGE the records in QuickBooks
- Switch to Single-user Mode if you're using QuickBooks Desktop.
- Find the Customer record that you want to keep. Select the Customer Name (e.g., Smith Photography) and copy the Customer Name to your clipboard (CTRL + C).
- Find and Edit the Customer record to be renamed and merged (i.e., Smith).
- Paste (CTRL + V) the name we copied in Step 2 into the Customer Name field and click OK
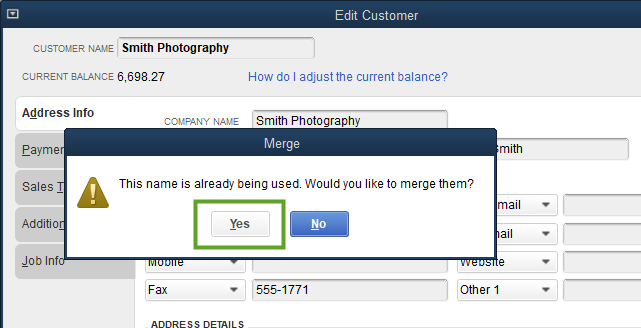
- Click Yes when prompted "This name is already being used. Would you like to merge them?"

- You may need to enter the Closing Date Password if there are related transactions prior to the closing date.
Note: Merging customers may affect transactions from closed periods, but the process should not have any material impact on financial reports. The Customer Name will change on prior transactions, but no transaction amounts will be modified by the merge.
- Sync with QuickBooks in Acctivate. If we have existing transactions, we'll link them to the surviving customer record.
- Confirm that only one customer record now exists in both QuickBooks and Acctivate with all related info and transactions.
- Switch back to Multi-user Mode if you're using QuickBooks Desktop.