When adding or modifying a custom report, you'll need to navigate to the proper place to locate files and insert files. Check out this article for more details.
If adding a new custom report in Acctivate or just updating an existing report, the report file (a ".rpt" file) will need to be placed into the correct place. This can differ depending on your Acctivate version. These file types cannot be opened without Crystal Reports. When loading reports sent from an outside party, simply save in the proper location.
Acctivate Version 12.1 made significant changes to how reports are stored and accessed in Acctivate. If you're on 12.1, read on for instructions. If you're on version 12.0 and lower, click here.
Version 12.1 and higher:
As of Acctivate version 12.1, reports are now stored in the Acctivate database and are no longer stored in a file directory. You will now use the "Manage Reports" section of Acctivate to add and replace reports. Replacing reports and creating new reports is now greatly simplified. For a video on how to complete these steps, please click here.
- To navigate to the report's directory, click "File" -> "Manage Reports."
Replace a default report or previously customized report with a new version:
- If this report was sent to you by a member of the Acctivate team, save the .rpt file on your desktop. Otherwise, just make sure you know the file path to access the report.
- Go to File > Manage Reports
- Once the window opens, find the existing report you're replacing on the left hand side of the window. The name of the report you're replacing should be shown in the Report Description field once it's selected.
- To update default sales forms, such as the invoice, order, pick and pack lists, expand Order Processing > Forms
- To update purchasing forms, expand Purchasing > Forms
- Click the "Check in report" button.
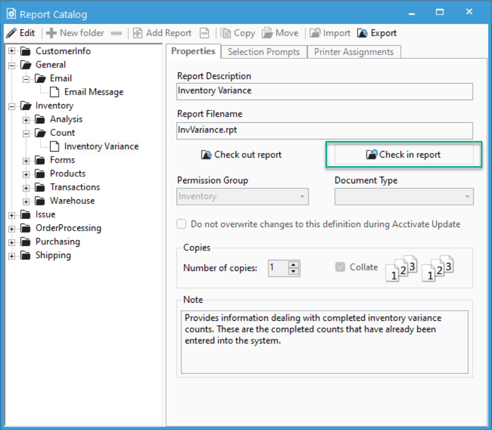
- A file search window will open. Navigate to the .rpt file and select it.
Your new report is now checking into the database and useable. You may need to close and reopen the report navigation or refresh to see your changes. If you ever need to get the file out to modify it, select the "Check out report" button.
***Stop here if you are updating or replacing a standard report in the catalog***
Creating new report definitions for new reports:
If you've designed a completely new report, you'll need to create a new definition for the report. To do that, take these steps:
- In "Manage Reports," click on the "Edit" button on the top bar.
- Click on the "Add Report" button and select the folder where the report definition will go.
- If you'd like to create a new folder to store reports, select one of the current report sections and click the "New Folder" button.
- Type in the name to use for the report.
- Click "Check in report" and navigate to the directory your custom report is saved in.
- Assign the relevant Permission Group and Document Type.
- Permission Group will determine what permissions are needed to access the report.
- Document Type is only used if replacing one of the reports NOT printed from the general report directory.
- E.g. Invoice Document, Order Document, PO, etc.
- Enter a note if desired.
- Select the "Selection Prompts" tab and assign any relevant selection prompts. If you're not familiar with selection prompts, please refer here.
- Select the "Printer Assignments" tab and assign any relevant printer assignments for the report. If you're not familiar with printer assignments, please refer here.
- Click the save icon to save your new report.
Version 12.0 and lower:
This guide is broken up into three sections depending on your needs:
- Navigating to the directory.
- Replacing an existing custom report with the same name or replacing a standard report with a custom one.
- Creating a new report definition with a new report.
Navigating to the Custom Reports Directory:
The custom report folder is located within the AcctivateData share which can be accessed by opening File Explorer within windows and navigating the path \\ServerName\AcctivateData\CustomReports
If you do not know your server name for that path you can also access the directory by following the below instructions
- Open Acctivate Configuration Manager.
- Select Reports > Report Catalog
- Open any report section and select any report. For this example, I've opened CustomerInfo > Aging > Customer Aging by Due Date (Detail)
- Click on the "..." button to open the CustomReports directory.
- Click in the blank space next to the path (where it says Network > ServerName > AcctivateData > CustomReports) and then copy the full network path.
- Exit out of the "Open" window and open a new File Explorer session and paste the path in there. (So you don't potentially overwrite the report definition from step 3.)
It's recommended that you either memorize this path or save it so that in the future you can just simple Copy/Paste the path and jump to the directory without needing to do and of the above steps.
Replacing an existing custom report or default report:
- If you are replacing an already existing custom report, simply just drop your file into this directory and when prompted to "Replace" the previous report, Click "Yes" to replace.
- If you don't wish to overwrite the old file and would rather keep it as a backup just in case, you can either rename the old file to have a different name or move it to a separate folder.
- If you are replacing a standard Acctivate report with a customized report, you will need to ensure that the report matches the file name of the standard report EXACTLY. If you have been sent a customized report from Acctivate support, the file should already be appropriately named and ready to drop into this directory.
- If the report was given to you by a consultant or it was customized in house and the file name was changed to match the standard Acctivate file name, you'll need to refer to this spreadsheet to see what the file should be named. This can be found in column B.
- In order to keep this report customized after Acctivate Updates, you'll need to go into Configuration Manager -> Reports -> Report Catalog and locate the report and then check the "Do not overwrite during Acctivate update" checkbox, or it will be overwritten with the default.
Create a custom report template for adding a new report:
If adding a brand-new customized report into Acctivate that isn't simply a modification to an already existing report, you'll need to create the report definition. If the file is an ACCTRPT file, there is actually separate steps to import those in as they are imported via the "Import Report" button. Check out that guide here.
- Navigate to File > Configuration Manager > Reports > Report Catalog
- If this report should use the same configuration settings as an existing report, select the existing standard report from the catalog and click the Copy Report button (icon with two pages).
- If this is a new report template, select a folder for the new report and click the Add Report icon.
- Update the Report ID, Report Description, and Report Filename. Copied reports will use the Permission Group and Document Type of the original report. New Report templates will require one or both of these to be set up.
- Report ID is an internal unique ID for Acctivate to use in the database.
- Report Description is the name that will display for the report in the software
- Report filename is where the ".rpt" file for the report will be found. Use the button with three dots to browse for the report.
- Permission Group controls what user permission is required to access the report.
- Document Type controls where the report can be accessed. If empty, it will be under the general report list. Otherwise, if it needs to appear in a certain window such as a Pick Ticket, set the appropriate type to have it appear in that window's options instead.