Resolving the Message "QuickBooks...is already running" while Syncing when QuickBooks is Open
"QuickBooks can’t start because it is already running" usually indicates you're attempting to open a second QuickBooks file. If this message appears during the sync, run Acctivate as Windows Admin.
If attempting to sying with QuickBooks you see the messages below, try launching Acctivate with "Run as administrator" by right-clicking on the desktop icon, find in the Windows Start menu, or opening the file location and then right-clicking on the application. You may also need to open QuickBooks as Windows admin.
QuickBooks can’t start because it is already running. Only QuickBooks Accountant can open more than one company file.
Error while connecting to QuickBooks
Could not start QuickBooks.
Please open a company in QuickBooks to continue.
If running as Windows admin resolves the syncing issue, either make privilege changes or allow QuickBooks and/or Acctivate to always run as Windows Admin. Follow the steps below to make these changes.
NOTE: Depending on if you access Acctivate from the start menu or the desktop icon, you may need to grant either/both the "File Location" or the desktop icon Windows Amin permissions.
-
Desktop Icon
-
Right-click on the desktop shortcut
-
Select Properties.
-
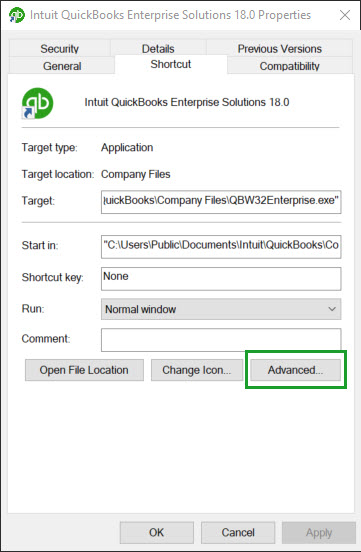
Under the Shortcut tab, select Advanced.

-
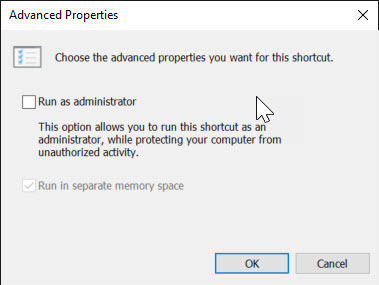
Check "Run as administrator" and select OK.

-
Select Apply and close the Properties window.
You may receive a message that you need Windows permission to apply the changes. Select OK and continue to apply the changes.
-
-
No Desktop Icon
-
Open the Windows Start menu and type either QuickBooks or Acctivate.
-
Select Open File Location on the application.
-
Once in the file location, right-click on the application.
-
Select Properties.
-
Under the Shortcut tab, select Advanced.
-
Check "Run as administrator" and select OK.
-
Select Apply and close the Properties window.
You may receive a message that you need Windows permission to apply the changes. Select OK and continue to apply the changes.
-