Sometimes when printing from Acctivate, users will get a generic message saying "error - printing", "error printing", "The printer couldn't print", or a message similar. In this case, first, verify that you can print to this printer outside of Acctivate by saving the file as a PDF and then try to print. If you are still getting the same message, contact your System Admin to help with printer issues. If you are able to print outside of Acctivate to the same printer on the same workstation or server, please follow the directions below.
Follow our guide on Enabling Verbose Printer Logging to view more details on the printer message. If you are receiving this message, please follow these directions to setup the printer port. The message indicates what port the printer is configured with.
Document 10, Print Document owned by [UserName] on
[ComputerName] was printed on [PrinerName] through port [PortName].
Size in bytes: 205466. Pages printed: 1. No user action is required.
Please Note: Acctivate leverages the Crystal Reports framework for printing and report generation. As of 2041, Crystal Reports is unable to use WSD ports for printing, therefore WSD printers are NOT compatible with Acctivate. You will need to setup TCP/IP. Please see below for steps to resolve.
Steps to resolve the printer error message
Note: the steps below are for Windows 10. Accessing the Printers Settings on other versions of Windows may be different.
- Open Control Panel in Windows Start, then click 'View devices and printers'.
- Right-click on the printer used.
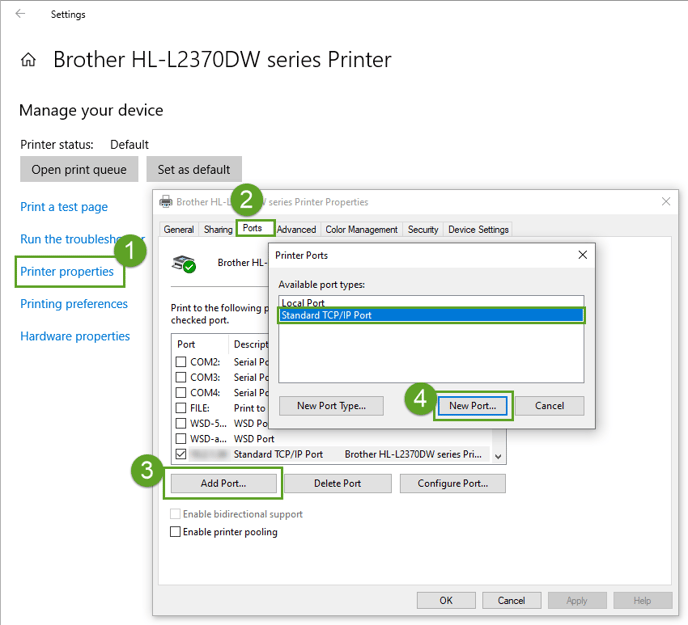
- Click Printer Properties.
- Go to the Ports tab, sometimes called Add Ports.
- Using the Printer column to find the printer port, check to see if the Port Description is a WSD Port or a TCP/IP Port. Acctivate should use a TCP/IP Port.
- Click the "Add Port..." button.
- On the Printer Ports window, select Standard TCP/IP Port and then "New Port..."
- In the Add Standard TCP/IP Printer Port Wizard, click Next.
- Add the IP Address for the printer in the Printer Name or IP Address field. The Port Name field should automatically fill in after you add the Printer IP Address.
- Windows should connect to that port and discover the printer. You should see the message "SNMP: Yes, Protocol: LPR", or a similar message.
- Click Finish, then Close.
- On the ports tab of the Printer Properties window, check the box next to the port you added to select that port.
- Click Apply, then OK.
- Now try printing from Acctivate.
Document 15, Print Document owned by [UserName] on [ComputerName]
was printed on [PrinerName] through port [PortIPAddress].
Size in bytes: 205677. Pages printed: 1. No user action is required.
If the issue persists, we recommend restarting the print spooler service and Acctivate before attempting to print again.
To restart the print spooler service:
1. Open "Services"
2. Scroll and locate "Print Spooler" and click restart.
3. Restart Acctivate as well and then attempt to print again.
