Use the following steps to create a backup of your "Live" company using the Backup Company function within Acctivate and restore this to either an existing PRACTICE or MODEL Company or a new Company.
Be sure to complete all the steps before logging into the restored company.
- Create the Backup of your Live Company
- Open Database Maintenance > Database > Backup/Restore
- Select the Company you want to backup (your Live Company).
- Click Start Backup at the bottom right-hand corner. Make a note of the name of the Backup File, which will be used in step 2.
- Once Backup is complete, you can then restore this backup of your Live company to your PRACTICE or MODEL company.
- Create a test company if one doesn't exist. (If it does, skip to step 3.)
- In Database Maintenance, go back up to Database -> Database Info.
- Select the New Company button
- Enter in a Company ID and Name (These can be the same, e.g. PRACTICE)
- If the QuickBooks data file field is visible, leave it blank for now. This can be filled in after step 3.
- Save the new Company.
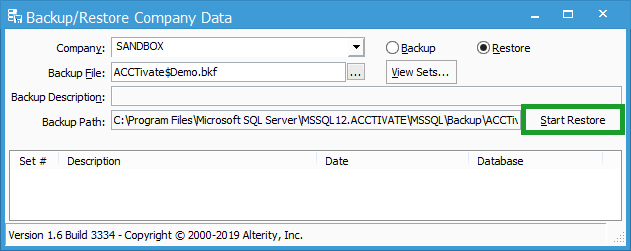
- Restore your LIVE database to your TEST company.
- Select the Restore button at the top of the Backup/Restore window.
- Change the Company dropdown to your TEST or MODEL Company. NOTE: If TEST does not appear in the drop-down menu, See Step 2!
- Type in the backup name, or use the ellipsis button to the right of the Backup File field to select the backup you created in step 1.
- Select View Sets button. You should see the Backup you just created if you have properly entered in the Backup File name.
- Select Start Restore
- Disconnect the test company from QuickBooks.
- After restoring the backup, return to Database -> Database Info In Database Maintenance.
- Click on the Test or Model company name to select it to and click Edit.
- Disconnect the company from QuickBooks:
- QuickBooks Desktop companies: Clear the QuickBooks data file path. Alternatively, you can create a copy of your QuickBooks Desktop file and select it if you wish to test sync changes. Be sure to not select your live QuickBooks company.
- QuickBooks Online companies: Click the Disconnect button.
- Click Save.
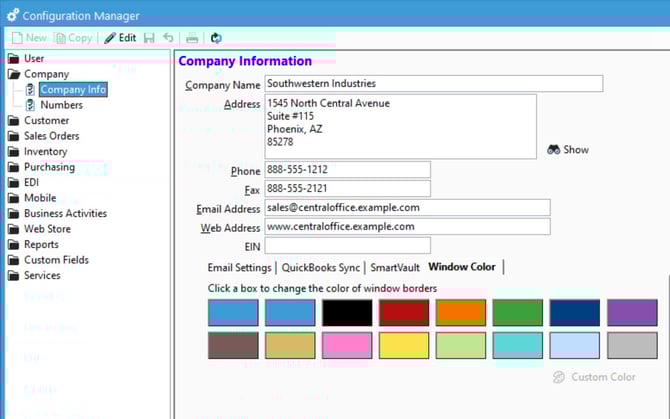
We also recommend having a different window color with your test company than your live company.
To do that, log into your test company, go into Configuration Manager -> Company -> Company Info and then select the Window Color tab and select a color. This can help further distinguish between your test and live companies.