Starting in Acctivate 12.0. Acctivate supports a direct connection to Microsoft 365 mail accounts using Microsoft 365's REST API which provides the most secure and simple setup for Microsoft 365 accounts. Please see this article up to date set up instructions.
We highly recommend using the REST API over SMTP.
This guide is split into three parts:
- Configuring Email settings to send from a company email.
- Configuring Email settings to send from each individual user's email.
- Configuring Email settings to send from a group email.
Please Note: Microsoft has changed their security settings to disable SMTP by default, require MFA and require non-browser applications (such as Acctivate) to use an "App Password" to send emails. This is split into three seperate articles:
- Sending Email with Office 365 Via SMTP. (Current Article.)
- Setting up and Enforcing MFA and SMTP.
- Creating App Passwords and using them in Acctivate.
Configure Acctivate email settings for Office 365 for company email use.
First, you may want to configure a shared "company" email address that can be used by all Acctivate users to send email. This is something to consider, but it is optional. It is recommended that you leave the default Company Email Settings as Microsoft Mail, then skip to Section 3 to configure the email credentials for each user.
- Log in to Acctivate as a user with Admin permissions (e.g. SYS)
- Open Configuration Management from File menu
- Expand the Company folder on the left and click Company Info.
- Click Edit on the Toolbar
- Select the Simple Mail Transfer Protocol option (bottom-right)
- SMTP Server: [ smtp.office365.com ]
- Encryption: [ STARTTLS ]
- [ X ] Authentication Required
- Username [ CompanyAccountOffice365Account@YourCompany.com ]
- Password [ CompanyAccountOffice365Password ]
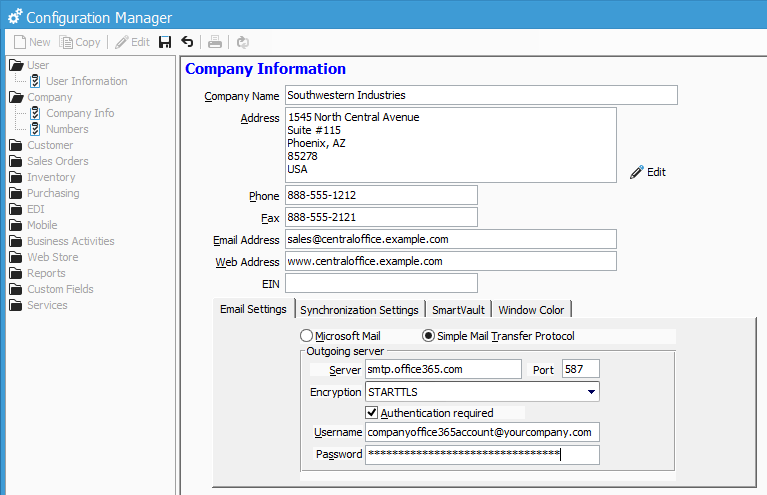
- Click Save on toolbar
- All users should restart Acctivate before sending email
Set up Email Accounts for Each User
Microsoft has placed some restrictions that makes it difficult to send email from alternate email addresses. By default, outgoing email must be sent from your Office 365 account email address (e.g., yourname@yourcompany.com). Acctivate stores the Office 365 credentials for each user. When using this setup, each user must use the email address setup in Configuration Management. For example, bob@example.com cannot change the FROM address to mary@example.com when logged in as Bob's user. The email server will shoot back an error about the user not having permission to send from that email address. You will need to set up the Email credentials for each user.
- Log in to Acctivate as a user with Admin permissions (e.g. SYS)
- Open Configuration Management from File menu
- Expand the User folder on the left and click User Information
- Click Edit on the Toolbar
- Select the User in the Acctivate Users list
- Verify the Email Address matches the Office 365 account for the user
- Change the Email settings to Personal
- Scroll down and select the Simple Mail Transfer Protocol option
- SMTP Server: [ smtp.office365.com ]
- Encryption: [ STARTTLS ]
- [ X ] Authentication Required
- Username [ UsersOffice365Account@YourCompany.com ]
- Password [ UsersOffice365Password ]
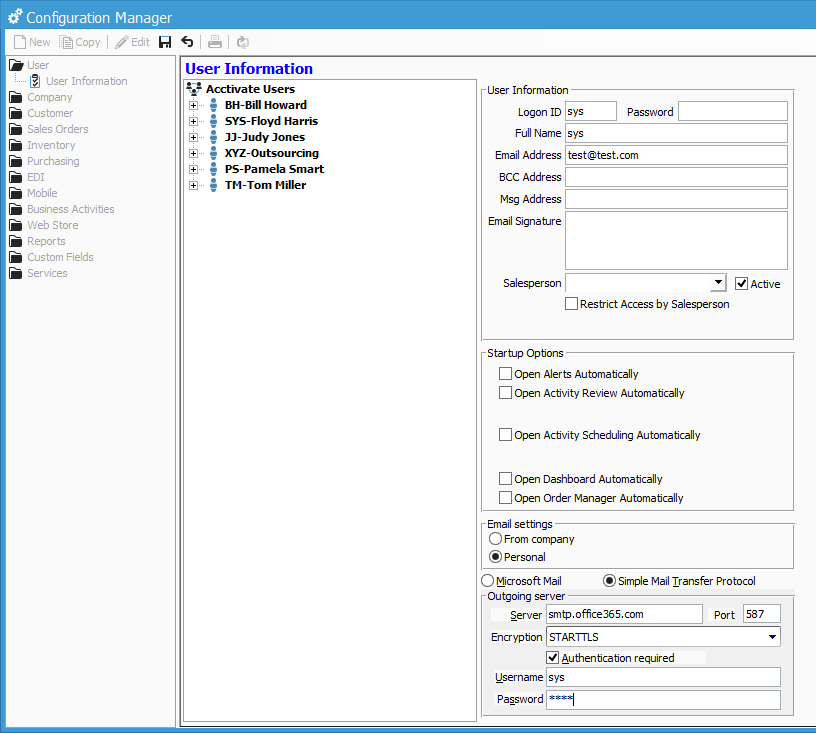
- Repeat for each User
- Click Save on toolbar
- All users should restart Acctivate before sending email
Configure Group Email addresses
Acctivate should now be ready to send email messages from your company Office 365 account and/or each user's account. However, you still may want to configure a group email address (e.g., sales@yourcompany.com). This is useful for email templates for Sales Orders, Purchase Orders, etc.
Microsoft has documented how to set this up. Please refer to the Send email from another person's mailbox or from a group in Office 365 Guided Walkthrough
Troubleshooting Tips
If you run into an issue where Acctivate begins timing out and/or crashing after following the above steps please review the following.
By default SMTP sends and receives message via port 25, some IPs will block this port due to the high amount of viral traffic that is generally received/associated with that port (It is the default after all). To get around this block try changing the SMTP port used by Acctivate to either 587 or 465. You can do this by adding either :465 or :587 to the end of the SMTP address (ex. smtp.office365.com:587)
Next Steps:
After setting up SMTP for use in Acctivate, you will next need to:
- Setup MFA within Office 365 and enforce it.
- Enable the use of SMTP
- Create App passwords in Office 365 for use within Acctivate.
Please check out the respective guides to these.