Acctivate can be integrated with the Z-Firm ShipRush shipping workstation software if your company has an existing install of ShipRush Desktop (SQL Edition) or you can integrate Acctivate with ShipRush Web Shipping
ShipRush SQL Edition
The following instructions will guide you through the integration, once you have installed ShipRush on a computer with access to the Acctivate database running on Microsoft SQL Server.
The ShipRush SQL edition is required. You’ll only need to set up the “CM Settings” once, even if you’re using ShipRush with more than one carrier.
- Start ShipRush for UPS, FedEx or Stamps.com
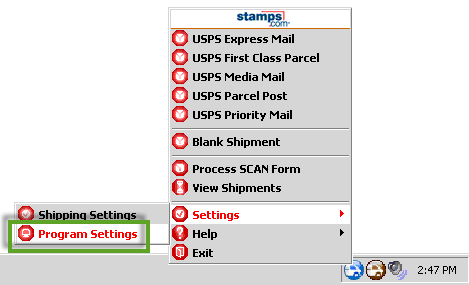
- Right-click on Ship Rush system tray and choose Program Settings from Settings menu.
- Click the CM Settings … button
- Select the Getting Contact Info tab and check the Database box
- Click the button on the right-side of the DB Connection String field to set up the connection to the Acctivate database
- Choose Microsoft OLE DB Provider for SQL Server and click Next
- Use the drop-down to Select or enter a server name. It’s usually COMPUTERNAME\ACCTIVATE, using the computer name for your server.
- Click Use a specific user name and password for step 2.
- The User name is typically SA with the password for your SQL Server. The Acctivate support team can assist if you do not know your password.
- Check the Allow saving password option
- Choose your database from the Select the database on the server drop-down
- Click Test Connection. You should see a Test connection succeeded message
- Click OK to return to the ShipRush Contact Manager settings
- Copy and Paste the SQL script for selecting records from Acctivate (see below) into the SELECT Query box
- Check the Show Search Dialog box
- Optionally select the Use USB Barcode Scanner box if you have a scanner and would like to scan the barcode from the Sales Order or Shipment documents.
- Check the Reopen after shipment processing box.
- Select the Writing History Info tab
- Repeat step 5 (above) to set up the database connection for writing shipment/tracking information back to Acctivate
- Copy and Paste the SQL script for writing records to Acctivate (see below) into the SQL Script box
- Click OK to save the settings
SQL Script for Selecting Sales Order records to ship:
SELECT
o.OrderNumber AS RecordID,
COALESCE(NULLIF(o.CompanyName, ''),NULLIF(o.CustomerID, '')) AS CompanyName,
COALESCE(NULLIF(o.ShipToAttn,''),NULLIF(o.ContactName,'')) AS ContactName,
o.ShipToAddress2 AS Address1,
o.ShipToAddress3 AS Address2,
o.ShipToAddress4 AS Address3,
o.ShipToCity AS City,
o.ShipToState AS State,
o.ShipToZip AS ZIP,
o.ShipToCountry AS Country,
o.ContactPhoneNumber AS Phone,
o.ContactEmailAddress AS EMail,
o.Reference AS Reference,
o.CarrierService AS Service
FROM OrdersAvailableToShip AS o
WHERE o.OrderNumber LIKE '%SEARCHPARAM%%'
NOTE: ShipToAddress2, ShipToAddress3 and ShipToAddress4 may need to be shifted based on the address block style you’re using in Acctivate and QuickBooks
- Be sure to select the option to clear prior search history upon import.
SQL Script to Write History Info back to Acctivate
INSERT INTO tbOrderPackagesText (
CarrierService, BillingOption, OrderNumber,
ShippingCharge, TrackingNumber, Weight, ShipmentDate)
VALUES ('%ShippingService%', 'Prepaid', '%RecordID%',
'%ShippingCharges%', '%TrackingNumber%', %ShippingWeight%, GETDATE())
NOTE: The above SQL Scripts are for shipping Sales Orders. You will need a different set of SQL scripts for Selecting Package Manager shipments. Please contact our support team to discuss options for integrating with Package Manager.