NOTE: This article frequently references something called an "instance". This is essentially an installation of SQL Server that has a name and can contain one or many databases. By default, Acctivate creates an instance called "ACCTIVATE". You can have multiple instances on a single server so if you already have one you would like to use, skip to the "Further Settings for SQL Server" section.
Upon installation, Acctivate automatically installs SQL Server 2019 Express in order to store and query data. The Express version is freely distributed but it is limited in performance and database size. Because of this, some users require a licensed version of SQL Server to move beyond these limitations. This article goes over how to set up and use an instance of a licensed copy of SQL Server and connect Acctivate to it rather than using the default Express install. It can also be used as a guide for setting up a different edition of Express since the vast majority of the process is the same. If creating your own SQL Server instance, please review all steps in this article to ensure nothing is missed since problems may be encountered otherwise.
If you're not moving servers, have a license key for a newer version of SQL Server, and your existing instance is of the same architecture (32-bit or 64-bit) as the version you're upgrading to, an install may not be necessary. In this scenario, you can simply update your current database instance to the newer version you have a license for. This process is much quicker and keeps the settings of your current install. If you fall under this scenario the case, please go to this article instead since installation and Acctivate configuration is not needed. Keep in mind that if your current instance is 32-bit and you're updating to SQL Server 2016 or newer, a new instance will be required to be installed since they are 64-bit only.
- Obtain a License for SQL Server
- Microsoft SQL Server Installation
- Install SQL Server Management Studio (optional)
- Further Settings for SQL Server
- Acctivate Installation
- Create the Connection to SQL Server within Acctivate
- Restore Your Database(s) to the New Instance
1. Obtain a License for SQL Server
While Acctivate relies on using SQL Server for its database, Alterity only distributes the Express version with the program. When it comes to licensed versions of the software such as Standard or Enterprise, it should be noted that Alterity does not sell Microsoft SQL Server. You can purchase SQL Server online or from a Microsoft reseller or partner. If you have questions about what type of license is required for the kind of performance needed, those questions are best left for the vendor you purchase from since it can vary widely whether it's based on CPU cores or "CALs". It's recommended that an IT professional familiar with your server and network be involved in finding the right license.
If you're actually looking to use the Express version of SQL Server, you simply need to find the installer online from Microsoft and for the version you wish to use. You can use this version as if installing a licensed copy but it will not require a license key.
2. Microsoft SQL Server Installation
When Acctivate installs SQL Server Express, it always does so with some options that are required but are not enabled in a straight install of SQL Server Standard or Enterprise. Because of this, please pay attention to the details in this section and the next since they can affect whether Acctivate is able to use the instance properly. If using an instance of SQL Server that has already been created, skip this section.
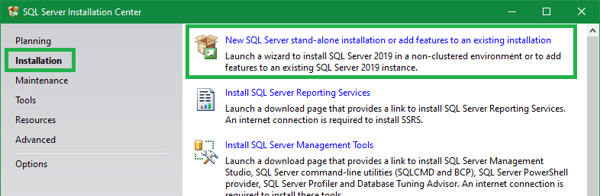
- Launch the SQL Server Installer on your server. The SQL Server Installation Center will open first so select Installation on the left panel and then "New SQL Server stand-along installation..." If you're directly running the Installation Center, you will probably be prompted to browse for the software installation media.
- Once the actual setup opens, it will start with updates. It will try to check here but you may want to run Windows Updates beforehand or right after this install since they will often include things SQL Server needs.
- Click Next until you arrive at the Installation Type section. Make sure that "Perform a new installation of SQL Server..." is selected.
- Click Next to arrive at the Product Key section. If running from the SQL Server installer provided by the vendor, the key should load up on this page automatically. Otherwise, you will need to have the key and enter it to progress.
- Click Next and accept the license terms for SQL Server. Click Next once more
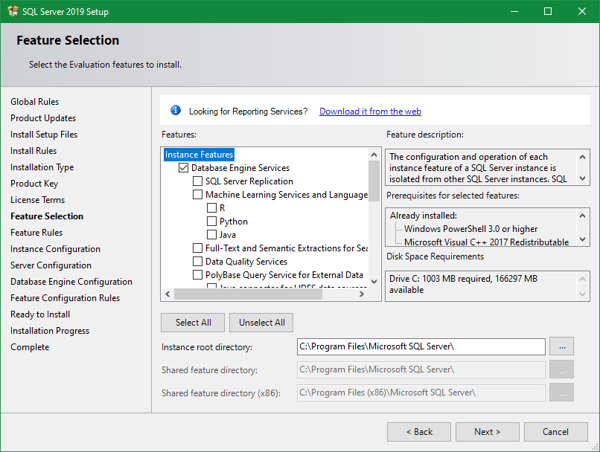
- You should now be at the Feature Selection page. Acctivate will only require that the database engine be installed so select "Database Engine Services". Select other tools if you think you would like to have them.
- This is also where you select where the instance of SQL Server will be installed which would contain the database itself, backups, and logs. If your intention is having the database running on a drive other than C:\ or at least within a different folder, you should change this now. A folder may need to be created beforehand for everything to go into if you don't want the various folders and files to all just be showing up in the specified location.
- Click Next for the Instance Configuration. It is highly recommended that you select "Named instance" and call the instance "ACCTIVATE". The box below shows instances that are currently on the system if you have any so if you already have one with the name "ACCTIVATE", choose something else that would be fitting such as "ACCTIVATE2019" in order to represent the version of SQL you're installing.

- If you use the "Default instance" option, the instance will be called "MSSQLSERVER". This causes the path to connect to this instance to behave a bit differently which will be covered later.
- At the next section, you can manage the Service Accounts under Server Configuration. Typically the defaults are fine but ensure that the Database Engine and Browser are set to Automatic. Acctivate does not require the Agent to be running.
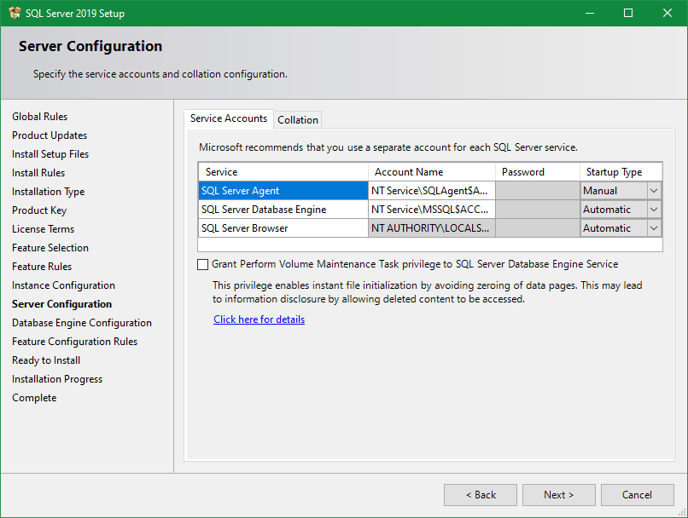
- If you run into an error with the database installation at the end, it could be due to permissions under the Account name for the Database Engine on this page. When redoing the install, you might try changing it to "NT Authority\System". Otherwise, please review the system accounts for roadblocks.
- On the next section, you will set up the authentication for this new instance. Set the Authentication Mode to "Mixed Mode". This will enable the SQL Server user "sa" which has full administrative control within SQL. If this is not done, you will have to log into SQL Server with the current Windows user and enable "sa" or create another admin account within SQL Server for Acctivate to use. Enter the password you wish to use for this "sa" account twice and make note of it since this will be used by Acctivate to connect to the instance.
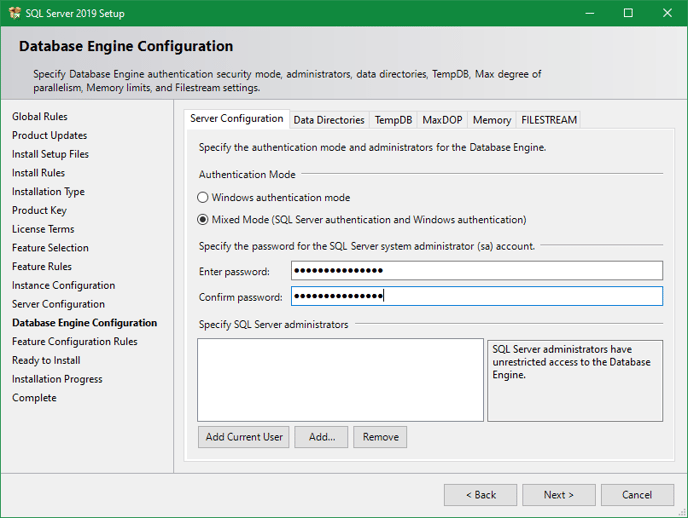
- Go ahead and "Add Current User" to have at least one Windows User with access. While not necessary, you may want to select other windows users to be administrators as well in order to access SQL Server within Management Studio.
- Click Next and you should be on the confirmation page. Review these to make sure the settings mentioned in this guide were implemented then complete the installation.
Further Settings for SQL Server Access
Beyond the proper installation of SQL Server, you need also make sure that any firewalls and anti-virus are not blocking access to the database instance as well as that the Client Protocols for TCP/IP and Named Pipes are enabled.
For Windows Firewall exceptions, follow the steps on this article to ensure that connections to the instance won't be blocked. Similar exceptions will likely have to be created for other firewalls if you have them.
For Client Protocols, open the SQL Server Configuration Manager tool. This is installed along with SQL Server and can often be found under the SQL Server tools in the Start menu of Windows. If you can't find it, it's usually under "C:\Windows\SysWOW64" as well. Once open, Expand the various sections in the left pane and ensure that any protocols for TCP/IP and Named Pipes are enabled. Otherwise, Acctivate will have problems connecting to the instance.
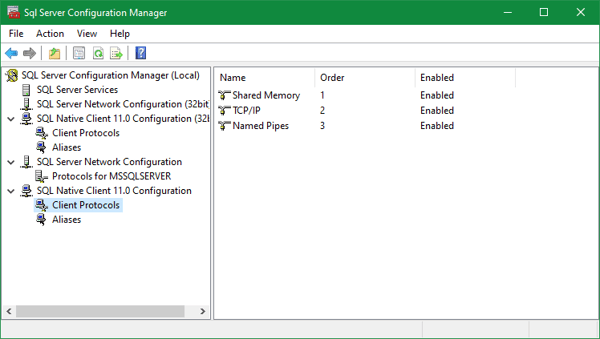
While you have this tool open, you may want to click on SQL Server Services and make sure the SQL Server (instancename) and SQL Server Browser are in a Running State. The instance itself is the first one and the Browser is what lets users across the network access the instance. If either are not running, there will also be connection problems.
Acctivate Installation
NOTE: If Acctivate is already installed on the server and you are just creating a new SQL Server instance, skip this section.
Assuming Acctivate isn't already installed on the server because you are moving servers or bring yourself back online, you can now start with step A in the How Do I Move Acctivate article. However, there are few things to note about the install:
During Acctivate's installation, it will first check locally on the server to see if an "ACCTIVATE" instance is already installed. If so, it will create its main "Acctivate" database as well as the "Acctivate$Demo" database there. Otherwise, it will install SQL Server Express 2019 and a new "ACCTIVATE" instance with these two databases. If you didn't give your instance this name during the SQL Server install and want to avoid having Acctivate simultaneously running from both Express and your licensed edition, you can use the steps in this article to install Acctivate onto a specified instance rather than only looking for one called "ACCTIVATE".
Create the Connection to SQL Server within Acctivate
If Acctivate was previously installed with a different database instance source than the one that was created in this install of SQL Server, then you will need to create one within Acctivate Database Maintenance or at least update the settings of the one that is already there. Open the Acctivate Database Maintenance tool which will be in the same folder as the Acctivate launcher and go to Database > Database Sources. In this window, you can either click New Source or Edit the one that is already there.
If the old data source is being discontinued, then we recommend you just simply rename the "Server name" value with the new instance.
If making a new one, you'll want to rename the old one to be something like "AcctivateOld" and give the new one a name of just "Acctivate". Next, make sure the Database Type is "MS SQL Server" then under Server Name, put the instance path which would be "SERVERNAME\INSTANCENAME". The server name is the name of the server computer and the instance name is the the instance you want to use. If the default instance MSSQLSERVER was used, you would actually just enter "SERVERNAME" since the path doesn't require the default instance name. Finally, set the Connection Information to "Use SQL Server authentication" and enter the "sa" ID and password. If you created another SQL user to Acctivate utilize, put that in instead.
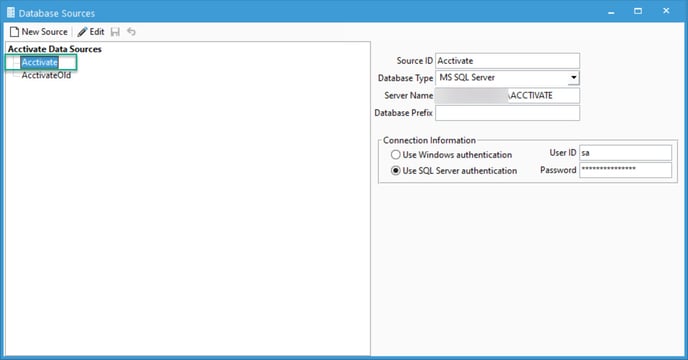
It is important that the datasource you're using is called "Acctivate" as this will trigger logic to create the "Master" Acctivate database on the SQL instance. If you do not have a master Acctivate database (Simply called Acctivate) then Acctivate will FAIL to run.
Restore Your Database(s) to the New Instance
With SQL Server and Acctivate properly installed, and a valid connection source has been created to the new instance, you can continue in the How Do I Move Acctivate article from step B and forward assuming your are actually moving Acctivate. When you get to step F, the company(s) should all have the database name they had on the old server or in the backup (usually Acctivate$CompanyName) and the source should be the source for the instance you want the database to run on. This is also where you would put the path to the QuickBooks company file for syncing to QuickBooks.
Once the companies are set up, you can use the Backup/Restore tool to restore backups to those companies. If the database doesn't exist such as when using an instance that was just created, the database will be created during the restore process. Alternatively, if the databases were already restored to the instance via SQL Server Management Studio or some other direct method, then pointing the company(s) to the correct database and source is all that is required. For pre-existing installations of Acctivate, changing the source and running the restore is the only thing left to do.
Install SQL Server Management Studio (Optional)
SQL Server Management Studio (SSMS) is a free program distributed by Microsoft for connecting to and managing SQL Server. Within it, you can do things such as query the database, backup and restore, create and manage SQL Server users, and much more. If you're running into issues with instance, databases, or the connection between Acctivate and SQL Server, you may want to install this program in order to assist with troubleshooting.
Once installed, you will need to select the instance you want to log into. "localhost" can be used if the instance is on the same computer. Otherwise, it will be "servername\instancename" where "servername" is the name of the computer the instance is installed on and "instancename" is the the name of the database instance which is usually "ACCTIVATE". After that, if the windows user has permission, you can use Windows Authentication to login. Otherwise, enter a SQL Server user and password such as the "sa" account.