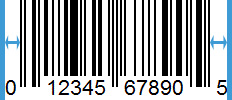
What to Know for Printed UPC Barcodes
This article includes details on the structure, size, font, and printer settings for UPC barcodes.
A UPC (Universal Product Code) is a standardized global identifier used to identify a product so that it can be sold and tracked through supply chains. Employing a UPC barcode can improve efficiency in your organization, however there are guidelines which should be followed.
UPC is a barcode symbol encoding a 12-digit number called a GTIN-12. A GTIN-12’s numbers are not random; they are a combination of reference numbers used to associate your products with you.
What’s in a UPC?

Company Prefix
The first 6-10 digits of the UPC is the GS1 Company Prefix and is assigned by GS1 to uniquely identify the brand owner. A GS1 Company Prefix is licensed from https://www.gs1.org.
Item Reference
The next set of numbers after the Company Prefix are the item reference. These are assigned by the brand owner to reference a specific item. Each individual product needs its own UPC. For example, a shirt that comes in three different sizes would require three different UPC’s, each with a unique item reference.
Check Digit
The last digit in a UPC is referred to as a Check Digit. The Check Digit is a calculated number based on the preceding digits of the UPC. This is used to ensure accuracy.
UPC Barcode
One of the most common linear barcodes is the UPC barcode, which is also known as a UPC-A. The UPC barcode is used to encode the GTIN-12 value. When generating a UPC Barcode there are many factors that need to be considered in order to be a consistently scannable barcode.
Acctivate utilizes and distributes the IDAutomation font set to generate UPC barcodes in Crystal Reports. It’s important to select the proper font and font size in order to print quality UPC’s.
Barcode Height (Font)
The Font will determine the height of the barcode. There are five ID Automation UPC fonts included with Acctivate. The “Medium” font is recommended and will produce about an inch tall barcode at 24 pt font size. The five fonts are listed below with their height at 24 pts:
- IDAutomationUPCEANXXS – 0.30”
- IDAutomationUPCEANXS – 0.60”
- IDAutomationUPCEANS – .825”
- IDAutomationUPCEANM – 1.065” (recommended)
- IDAutomationUPCEANL – 1.305”
Barcode Width (Font Point Size)
The font point size you select determines the width of the barcode.
When printing UPC barcodes to printers less than 600 dpi, such as a 203 dpi or 300 dpi printer, the recommended font point size for UPC is no smaller than 20 point. If you need to print less than 20 point, you should follow these IDAutomation guidelines based on your printer’s DPI:
- 203 dpi Printer: 12 pt, 18 pt, 24 pt*, 30 pt, 36 pt
- 300 dpi Printer: 12 pt, 16 pt, 20 pt, 24 pt*, 28 pt, 32 pt, 36 pt
*Recommended Font Point Sizes
The increase in font point size will increase the X-Dimension, which is the width of the narrowest space in the symbol. X-Dimensions are noted in “mil” units; a mil is one thousand of an inch. Typically it’s recommended to have an X-Dimension of no less than 10 mils (.010 inches). However if you are printing on UPC fonts on a 203 dpi printer it’s recommended you use a 24 font size, resulting in an X-Dimension of approximately 20 mils.
Quiet Zone
The Quiet Zone of a barcode is the blank area on either side of the UPC barcode. It’s recommended to have a Quite Zone of approximately 12 times the X-dimension and should be no less than nine times the X-dimension. This will ensure that the barcode scanner only reads the UPC barcode and that there is no interference from other barcodes, text, or graphics that may be near the barcode. Besides choosing proper barcode placement on your product, you can adjust the IDAutomation font and font point size, within the recommendations, to allow enough of a Quite Zone.

Printer Settings
Some printers may have their own settings regarding which barcode symbologies they can print. The Printer Properties dialogue window may contain a Barcode or Barcode Fonts tab. You should ensure that UPC A is a defined barcode font for the printer, if not, you may need to add UPC A as a barcode font for the printer. Refer to your printer’s user manual for more information.