Updating ODBC Connection to Use Live Database
If you originally setup a shipping workstation, such as UPS Worldship or FedEx Shipping Workstation, to work with your model company then you will need to follow these steps to update the ODBC connection to work with your live company.
If you're needing to create an ODBC for an initial setup, check out this article instead.
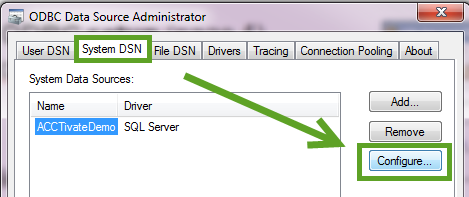
- Select Start Menu > Control Panel > Administrative Tools > Data Sources (ODBC). The ODBC Data Source Administration window will open.
- Click on the System DSN tab. Highlight the AcctivateCompany you created previously and select Configure
- The Microsoft SQL Server DSN Configuration window will pop-up. Click Next to continue with the process.
- Enter the password.
The Microsoft SQL Server administrator login is sa (i.e., System Admin). The password may have been changed during the installation or configuration of SQL Server. Please contact the Acctivate support team or your database or network administrator for credentials for the database. - Click the Next button
- Select Acctivate$CompanyName for the live company from the drop-down menu. This database name is the live database that stores your Acctivate data on the server.
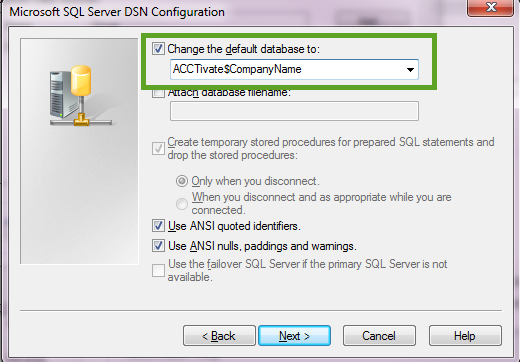
- If this is not available, please consult with your network or database administrator. Keep the other defaults and click the Next button.
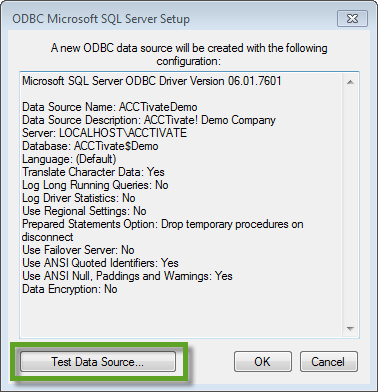
- The settings on this window should not need to be changed. Simply click the Finish button and a window titled ODBC Microsoft SQL Server Setup will pop-up.
- Quickly review the information on the ODBC Microsoft SQL Server Setup window. You may test the connection by clicking the Test Data Source button.
- When you are certain that the information is correct, click the OK button.
- The pop-up windows will close and you will be back at the main ODBC Data Source Administrator window.
- Click OK. The ODBC Microsoft SQL Server Setup window will close.