Mobile Inventory Transfers is a mobile add-on module that allows for inventory to be transferred from one warehouse and/or bin location to another directly from your Pocket PC, which tie into your main Acctivate system. Mobile transfers are available on Windows mobile and android as of 11.3.
- To quickly scroll to Windows instructions, click here.
- To quickly scroll to the Android instructions, click here.
Please Note: Both Windows and Android will automatically have the "Allow posting transfers from the mobile device" off by default. If you'd like to post transfers from mobile instead of just saving to post on desktop, go into Configuration Manager -> Mobile -> Inventory Transfers, and check the "Allow posting transfers from the mobile device" box to enable it. This affects Android and Windows.
Android Mobile:
- Login to Acctivate on your Android device using the same credentials as desktop.
- Select "Transfer"
- Depending on rather you're creating a new Transfer or Opening an existing one will change your steps:
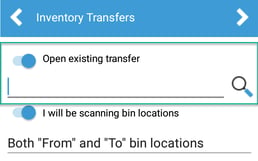
- If opening an existing transfer, slide the "Open existing transfer" slider to the right.
-
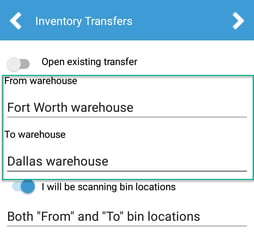
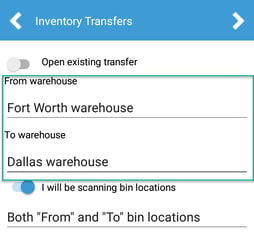
- If creating a new transfer, ensure the slider is set to the left side and select your "From" and "To" warehouses.
Existing Transfer:
Please Note: When opening an existing transfer from desktop, quantities and default from/to locations will be pre-filled.
- Select your session via the session lookup magnifying glass, or manually entering the number.
- (Optionally) Select if you are scanning bin locations.
- You have the option to choose only "From," "To," or "Both From and To." This will affect the sequence in which barcodes are scanned.
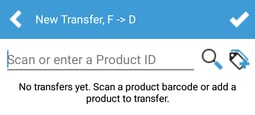
- Select the next arrow to start the transfer process.
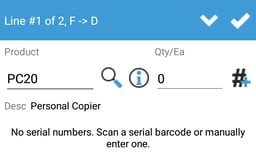
- Select a Product to open the "Line Detail" screen. You can also scan barcodes for ProductID's to add or increment the quantity or you can scan AI barcodes containing ProductID and Lot/Serial number to add the lot/serial and increment quantity.
%20-%20Resized.png?width=256&name=Transfer%20Screen%20(1)%20-%20Resized.png)
-
- Within the Line detail screen for a standard control (non Lot/Serial) product, you can scan a product barcode to increment quantity or manually change the quantity by entering a number.
%20-%20Resized.png?width=258&name=Line%20Detail%20(1)%20-%20Resized.png)
-
-
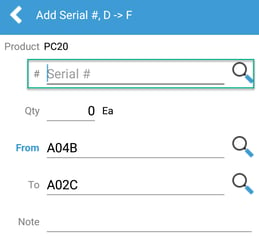
- If scanning Bin locations you must use barcodes with AI 99. (You can find Location Barcodes within the Acctivate program in Reports -> Inventory Management -> Warehouse.) The sequence of scanning will be "From" (if enabled) and then "To" if enabled. If only one is enabled then only one will allow for scanning. You can still manually update the location if needed. If you forget which location you're scanning, look at the "From" and "To" headers. The one highlighted in blue is the current one to be scanned.
- Click the Checkmark to exit the screen or use the up/down arrows to go to the previous/next line.
- Within the line detail screen for a lot/serial product, you can scan a barcode to add the lot and increment it's quantity. You can also click the '#+' symbol to enter the lot/serial detail screen to manually enter or lookup a lot/serial and set it's quantity.
-
-
-
- If scanning Bin locations you must use barcodes with AI 99. (You can find Location Barcodes within the Acctivate program in Reports -> Inventory Management -> Warehouse.) The sequence of scanning will be "From" (if enabled) and then "To" if enabled. If only one is enabled then only one will allow for scanning. You can still manually update the location if needed. If you forget which location you're scanning, look at the "From" and "To" headers. The one highlighted in blue is the current one to be scanned.
- Click the Checkmark to exit the screen or use the up/down arrows to go to the previous/next line.
-
- Once you have fulfilled the transfer quantities, click the checkmark in the top corner to submit the transfer.
- If you have the option to "Allow posting transfers from the mobile device" turned on then you can post the transfer by ensuring the "Post Transaction" slide is slid to the right side. Otherwise, you will be asked if you'd like to save the transaction.
- Click the Checkmark to save/post the transfer.
New Transfer:
- Select your "From" and "To" warehouse to transfer the product. This can be the same warehouse if just transferring between locations.
- (Optionally) Select if you are scanning bin locations.
- You have the option to choose only "From," "To," or "Both From and To." This will affect the sequence in which barcodes are scanned.
- Select the next arrow to start the transfer process.
- Either scan a Product barcode, a Product + Lot/Serial AI barcode, or lookup a product to add a product to this transfer.
- For a standard control (non lot/serial) product, you can continue to scan a barcode to increment quantity.
%20-%20Resized.png?width=258&name=Line%20Detail%20(3)%20-%20Resized.png)
- If scanning Bin locations you must use barcodes with AI 99. (You can find Location Barcodes within the Acctivate program in Reports -> Inventory Management -> Warehouse.) The sequence of scanning will be "From" (if enabled) and then "To" if enabled. If only one is enabled then only one will allow for scanning. You can still manually update the location if needed. If you forget which location you're scanning, look at the "From" and "To" headers. The one highlighted in blue is the current one to be scanned.
- Click the Checkmark to exit the screen.
- Within the line detail screen for a lot/serial product, you can scan a barcode to add the lot and increment it's quantity. You can also click the '#+' symbol to enter the lot/serial detail screen to manually enter or lookup a lot/serial and set it's quantity.
- For a standard control (non lot/serial) product, you can continue to scan a barcode to increment quantity.
%20-%20Resized.png?width=256&name=Lot-2%20(1)%20-%20Resized.png)
%20-%20Resized.png?width=259&name=Lot%20Detail-1%20(1)%20-%20Resized.png)
-
-
- If scanning Bin locations you must use barcodes with AI 99. (You can find Location Barcodes within the Acctivate program in Reports -> Inventory Management -> Warehouse.) The sequence of scanning will be "From" (if enabled) and then "To" if enabled. If only one is enabled then only one will allow for scanning. You can still manually update the location if needed. If you forget which location you're scanning, look at the "From" and "To" headers. The one highlighted in blue is the current one to be scanned.
- Click the checkmark to return to the transfer once you are done adding lots/serials to this product.
-
- Once you have entered in all products to be transferred, click the Checkmark to submit the transfer.
- If you have the option to "Allow posting transfers from the mobile device" turned on then you can post the transfer by ensuring the "Post Transaction" slide is slid to the right side. Otherwise, you will be asked if you'd like to save the transaction.
- Click the Checkmark to save/post the transfer.
Windows Mobile:
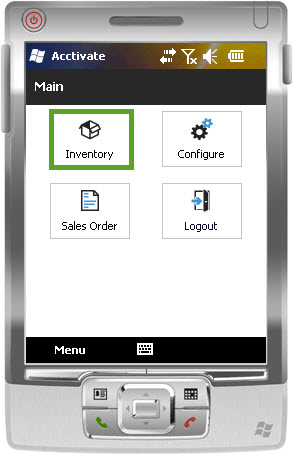
Transfer Inventory on Mobile Device- Log into Acctivate on your handheld device using the same credentials as on the desktop version.
- The main menu will open with two options, select Inventory
3. From the next menu, select Transfer
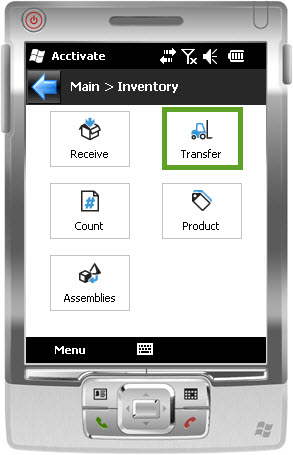
4. This opens the Inventory Transfers screen which shows 2 options:
- Open existing transaction – Choose an Inventory Transfer session which was created and saved prior to opening this window.
- Choose From and To warehouse to create a new Inventory Transfer session – If a session hasn’t been created, leave option 1 unchecked.
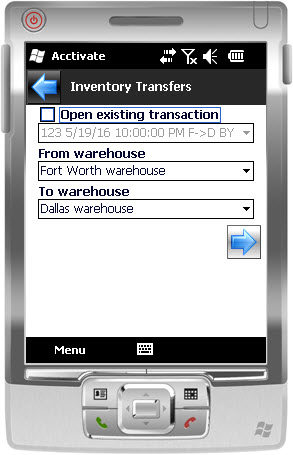
- When transferring between bin locations within the same warehouse, make sure the From and To warehouses are the same.
5. When ready, click the Right arrow
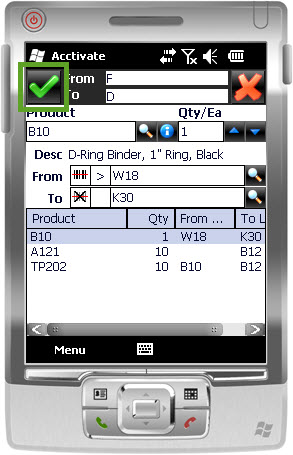
6.Add the product(s) you wish to transfer. This can be done by scanning a barcode, looking up the item, or manually entering the ID in the Product field.
- If transferring a lot/serial numbered item, the next screen will allow the user to scan, look up, or enter the lot/serial number, as well as the Qty and/or bin location.
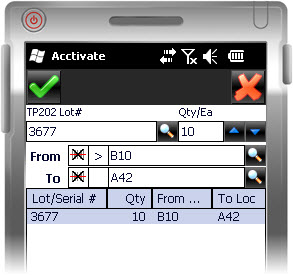
7. Specify a Qty for the item
8. If using bin locations, you have the option of scanning, looking up, or manually entering the From location and looking up or manually entering the To location.
9. Once all items are loaded, click the green check mark in the top left-hand corner.
10. The next screen gives the user the ability to Save and/or Post the transfer session.
- The Post transfer session option will be available based on the option in File > Configuration Management > Mobile > Inventory Transfers > Allow posting transfers from the mobile device.
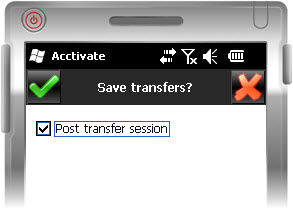
11. Click the green check in the top left-hand corner to submit/post the session
12. Saving the session will give you a message similar to “Inventory transfer session 124 submitted”. The message changes slightly when posting to “…session 124 posted”. A saved session will be available to open at a later date whether you need to open on the mobile device or in the Acctivate desktop app.