Adding Custom Reports into Acctivate
When adding or modifying a custom report, you'll need to navigate to the proper place to locate files and insert files. Check out this article for more details.
If adding a new custom report in Acctivate or just updating an existing report, the report file (a ".rpt" file) will need to be placed into the correct place. This can differ depending on your Acctivate version. These file types cannot be opened without Crystal Reports. When loading reports sent from an outside party, simply save in the proper location.
Replace a default report or previously customized report with a new version:
- If this report was sent to you, save the .rpt file on your desktop. Otherwise, just make sure you know the file path to access the report.
- Go to File > Manage Reports
- Once the window opens, find the existing report you're replacing on the left-hand side of the window. The name of the report you're replacing should be shown in the Report Description field once it's selected.
- To update default sales forms, such as the invoice, order, pick and pack lists, expand Order Processing > Forms
- To update purchasing forms, expand Purchasing > Forms
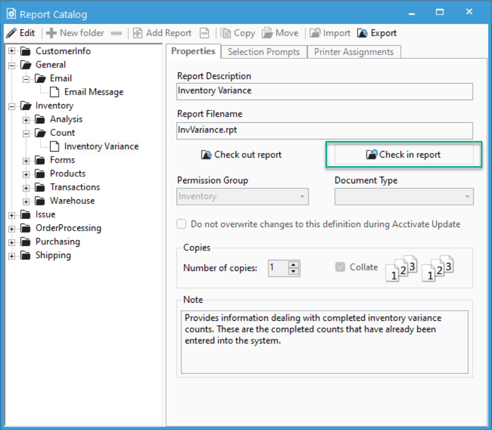
- Click the Check in report button.

- A file search window will open. Navigate to the .rpt file and select it.
Your new report is now checking into the database and useable. If the Report Catalog or Report Selection Criteria windows were open in the background, they will be closed automatically to ensure that the report data is refreshed and the new report is used.
If you ever need to modify the report file, select the Check out report button to export and save a copy of the .rpt file.
***Stop here if you are updating or replacing a standard report in the catalog***
Creating new report definitions for new reports:
If you've designed a completely new report, you'll need to create a new definition for the report. To do that, take these steps:
- In Manage Reports, click on the Edit button on the top bar.
- Click on the Add Report button and select the folder where the report definition will go.
- If you'd like to create a new folder to store reports, select one of the current report sections and click the New Folder button.
- Type in the name to use for the report.
- Click Check in report and navigate to the directory your custom report is saved in.
- Assign the relevant Permission Group and Document Type.
- Permission Group will determine what permissions are needed to access the report.
- Document Type is only used if replacing one of the reports NOT printed from the general report directory.
- E.g. Invoice Document, Order Document, PO, etc.
- Enter a note if desired.
- Select the Selection Prompts tab and assign any relevant selection prompts. If you're not familiar with selection prompts, please refer here.
- Select the Printer Assignments tab and assign any relevant printer assignments for the report. If you're not familiar with printer assignments, please refer here.
- Click the save icon to save your new report.